 Sous Chef Cloud
Online Documentation
GENERAL EQUIPMENT REGISTRATION PROCESS
Overview
The franchisee will create one “master account” on the Sous Chef Cloud website. Once the account is created, additional sites and pieces of equipment can be added, as well as adding Manager Accounts and access (described later in this document). This documentation can be used as a detailed guide for creating an account. Or you can simply
1) Go to http://souscheftech.com
2) Click “Create new account”
The site will guide you through setting up your account.
Follow the steps below to create a new Sous Chef Cloud account.
1) Go to http://souscheftech.com
2) Click “Create new account”
The site will guide you through setting up your account.
Follow the steps below to create a new Sous Chef Cloud account.
Step 1 – Sous Chef Cloud website.
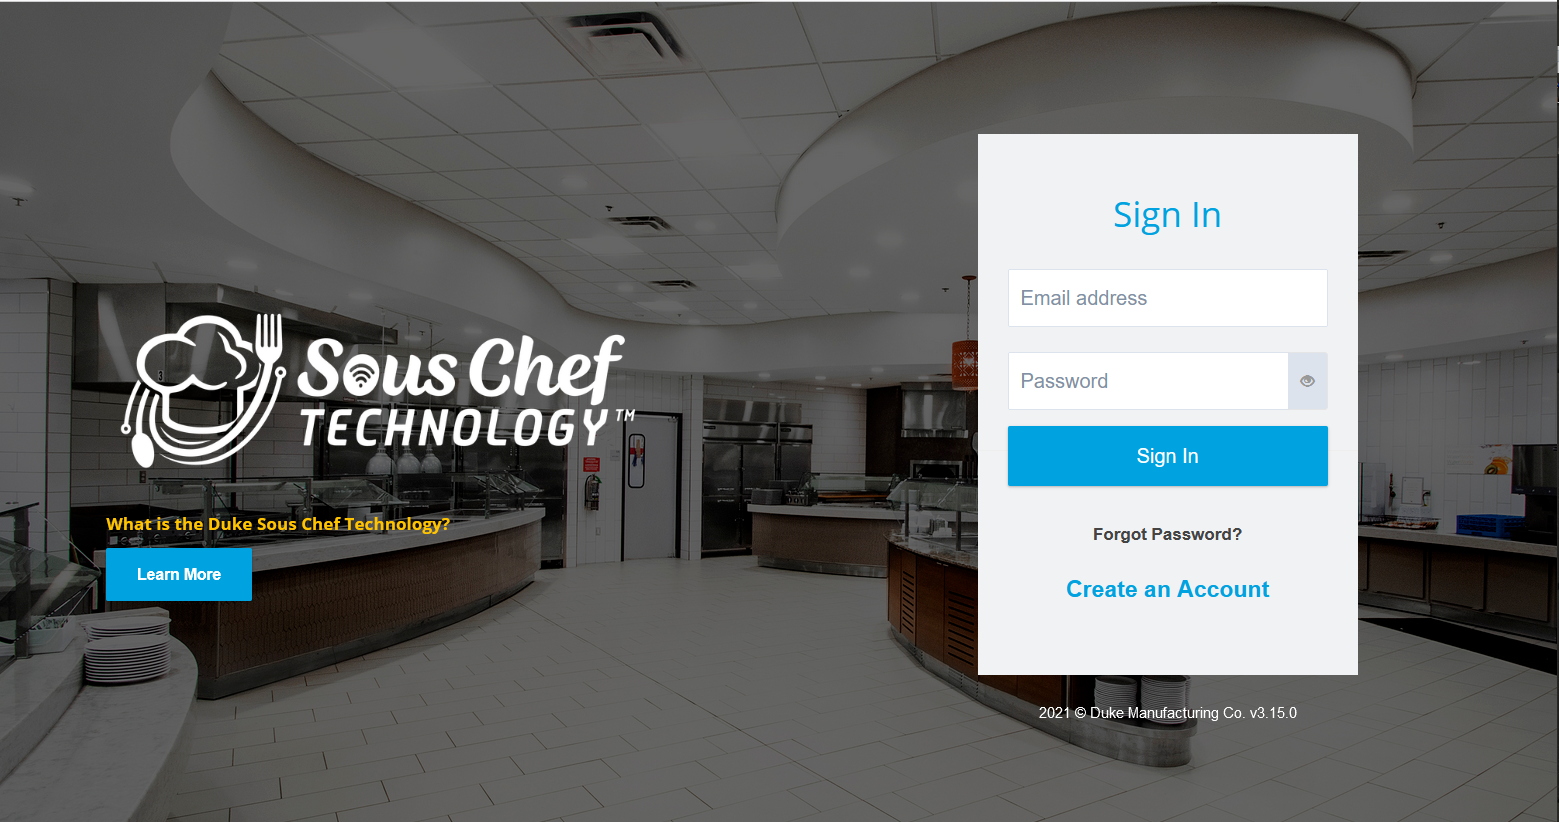
To create a new account, go to: http://souscheftech.com and the following home page will appear. Click “Create New Account”..
Step 2 – License Agreement
After clicking “Create new Account” the Duke License Agreement acceptance page will appear.
Scroll down the License Agreement and select the “I acknowledge and understand the License Agreement” checkbox.
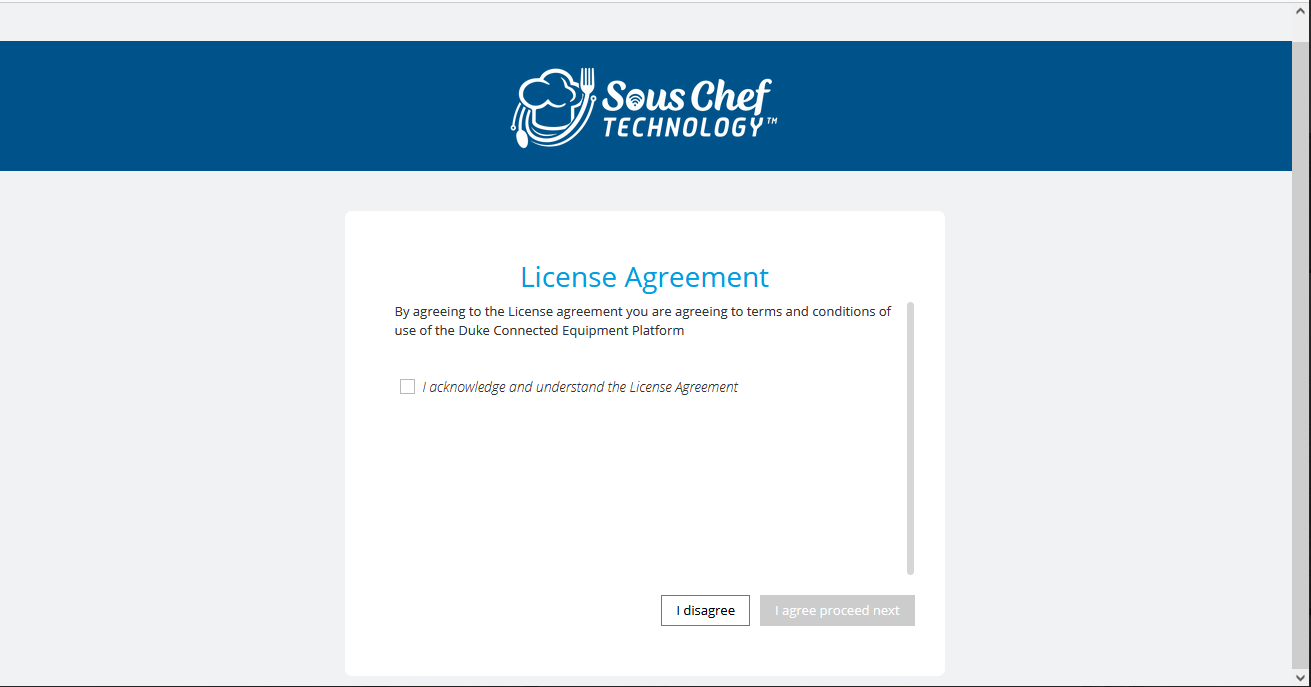
Once checked the “I Agree proceed next” button will be enabled. Click “I Agree proceed next”.
Step 3 – Email, Name and Password
You will now be directed to the ‘Create New Account’ screen. Enter the email to use for your account login. It must be a unique email address that has not previously been used to register as a new account. Any Sous Chef Cloud notifications will be sent to this email address.
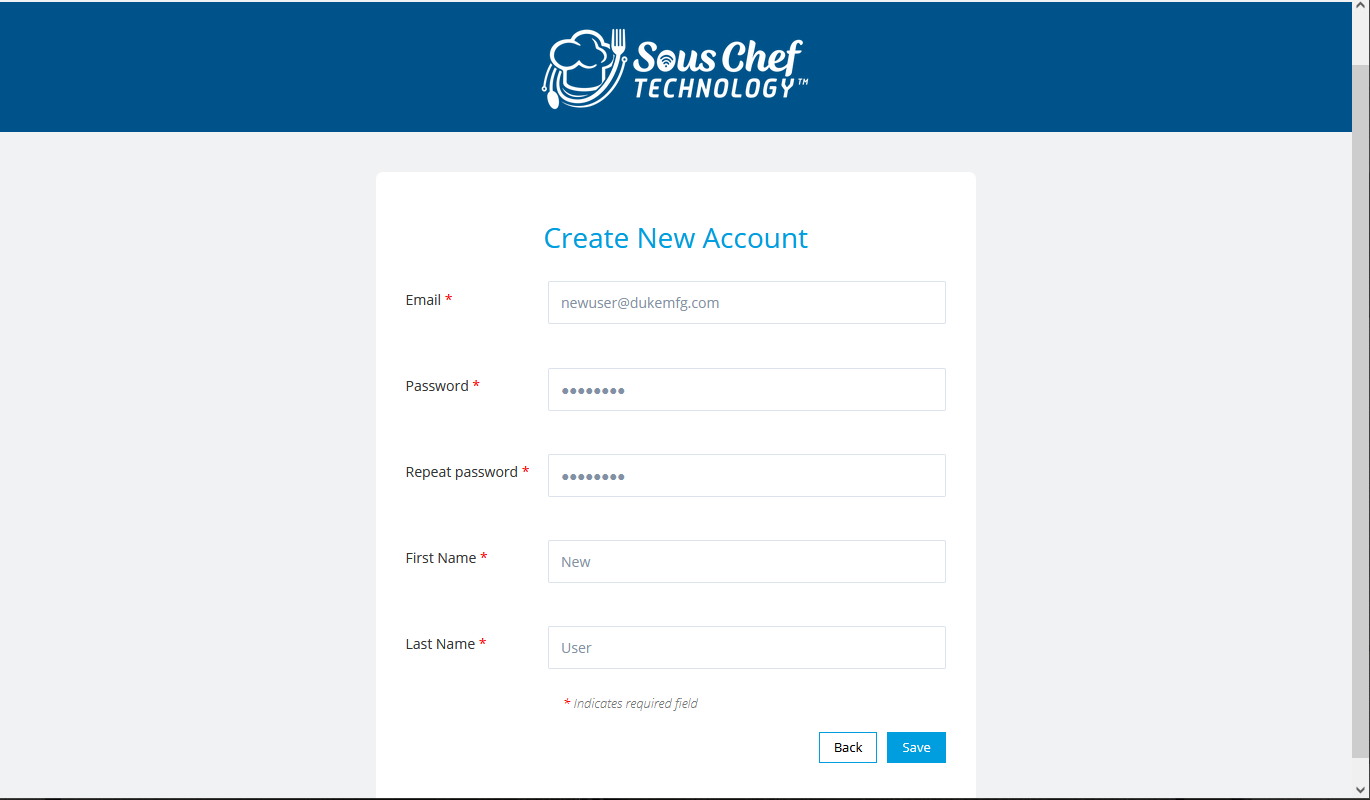
A password and repeat of the password for verification is also required. The password will be validated against the following conditions.
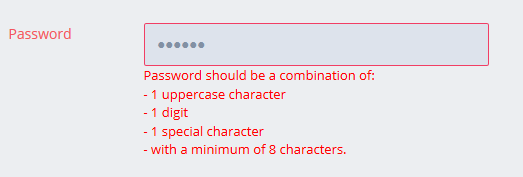
Complete the form by entering the First Name and Last Name of the registered user, then select “Next” to proceed to the next step of the registration process.
Step 4 – Email Verification
Following the email address and password entry you will be redirected to the following “Welcome!” page.
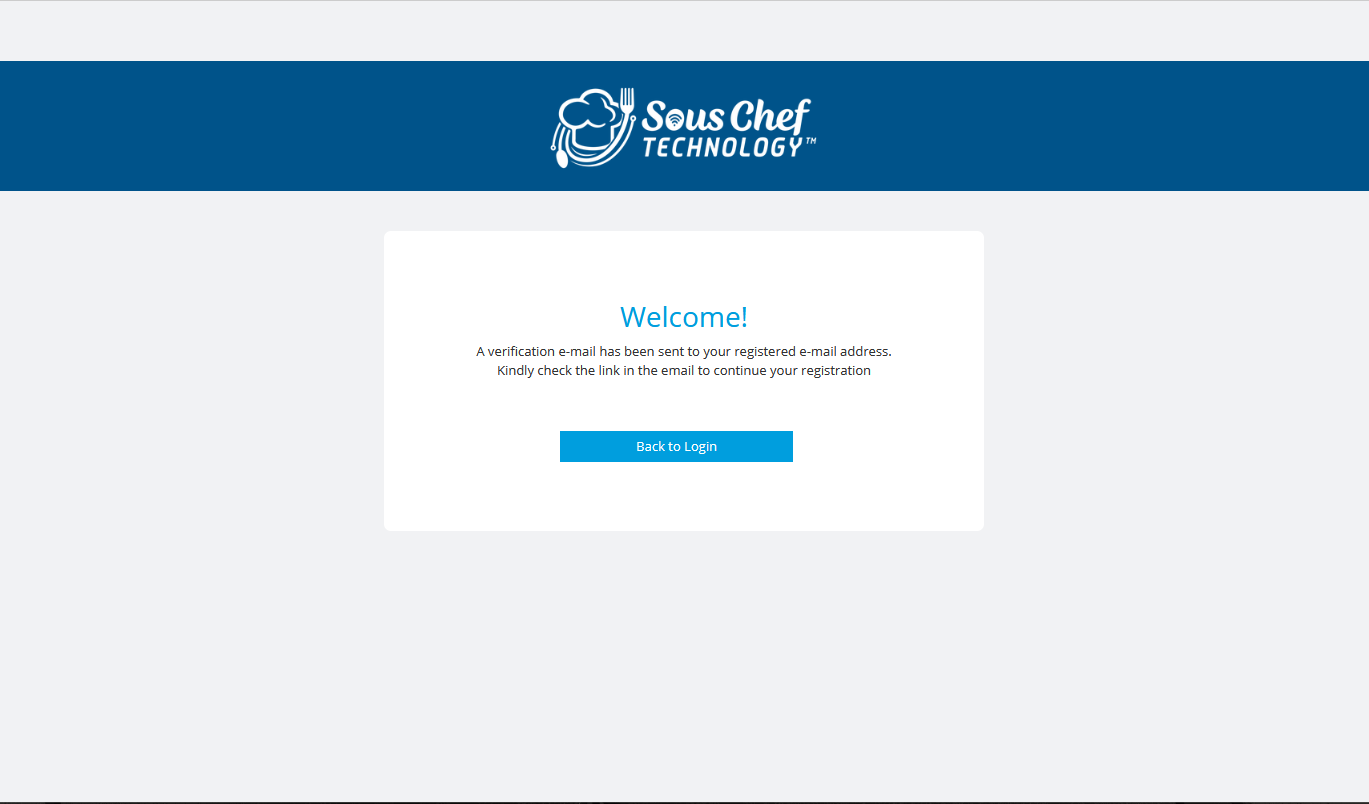
An email will be sent to the registered email.
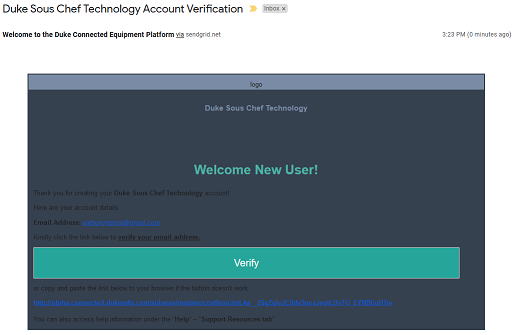
Click “Verify” to verify the new user’s email address. You will have a set amount of time to click “Verify” otherwise you will need to resend another verification request..
Once verified you will be returned to your default Internet browser to continue the registration process. See below:
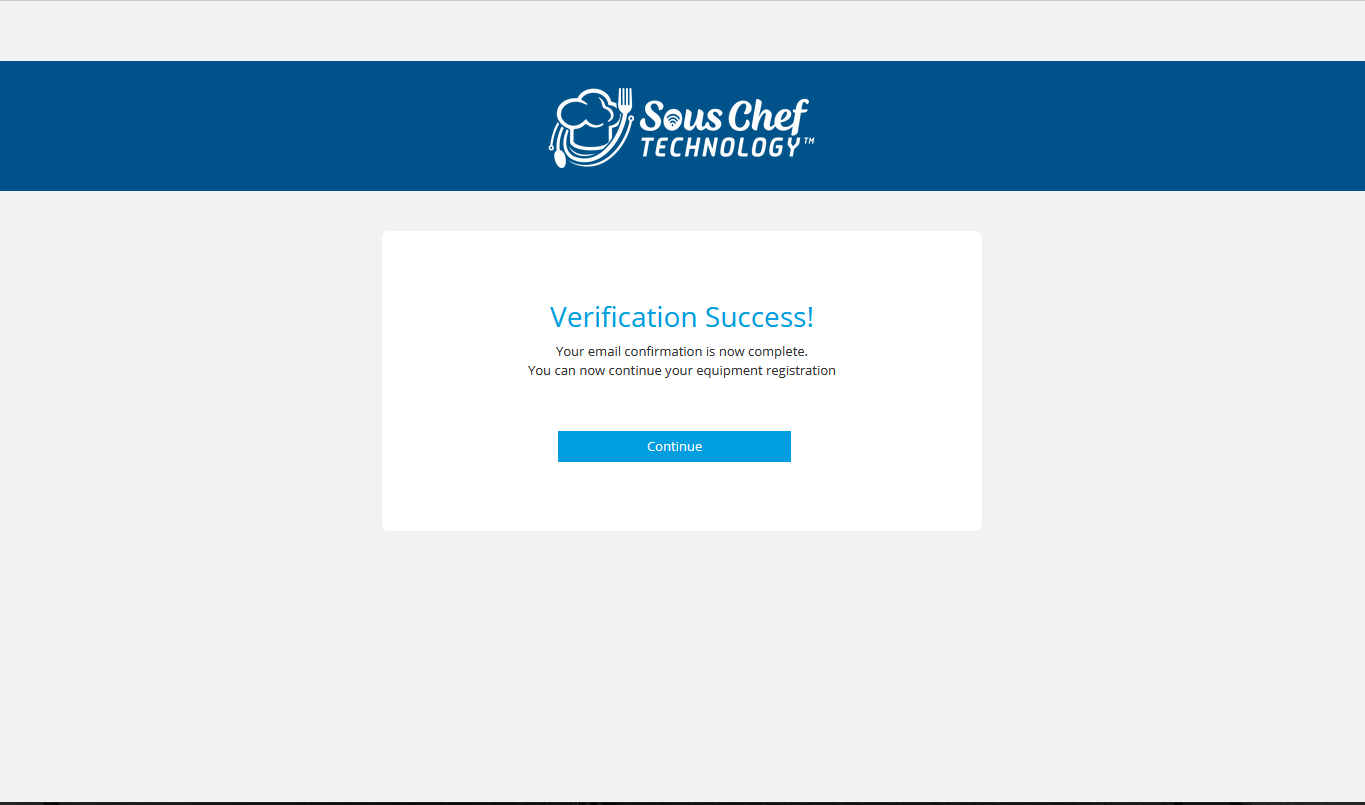
Click “Continue” to continue with the registration process..
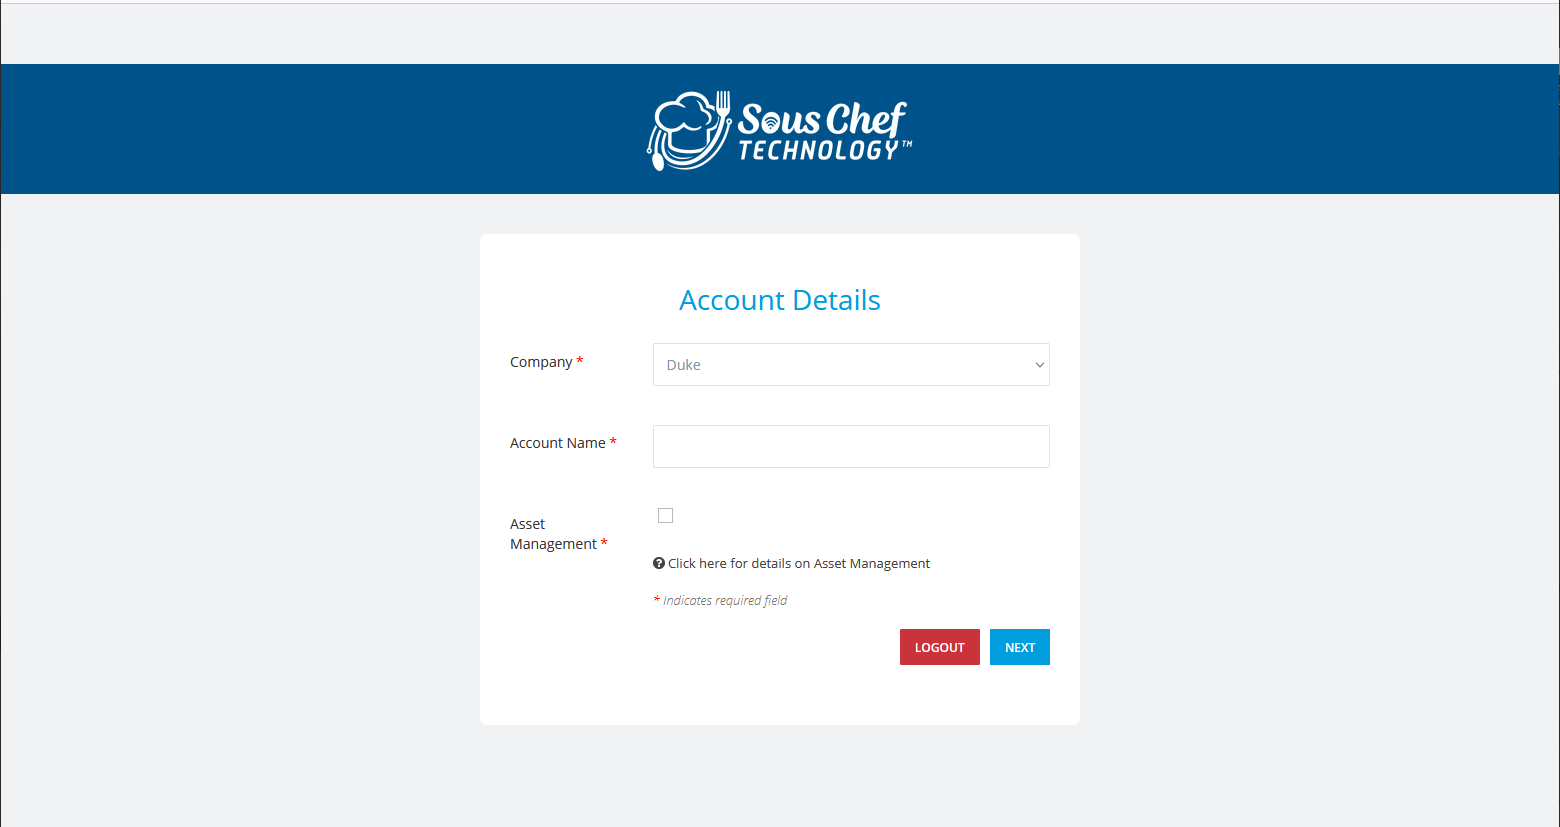
Step 5 – Account Details
Following the email verification process the Account Name can now be entered. The company type will be set automatically.
Next select the option on "Asset Management". Asset Management will allow sites and equipment details to be saved. It will also allow connections to online equipment within the account (if available). Enter the Account Name and select the “Next” button. Your account details will be saved at this stage.
See below.
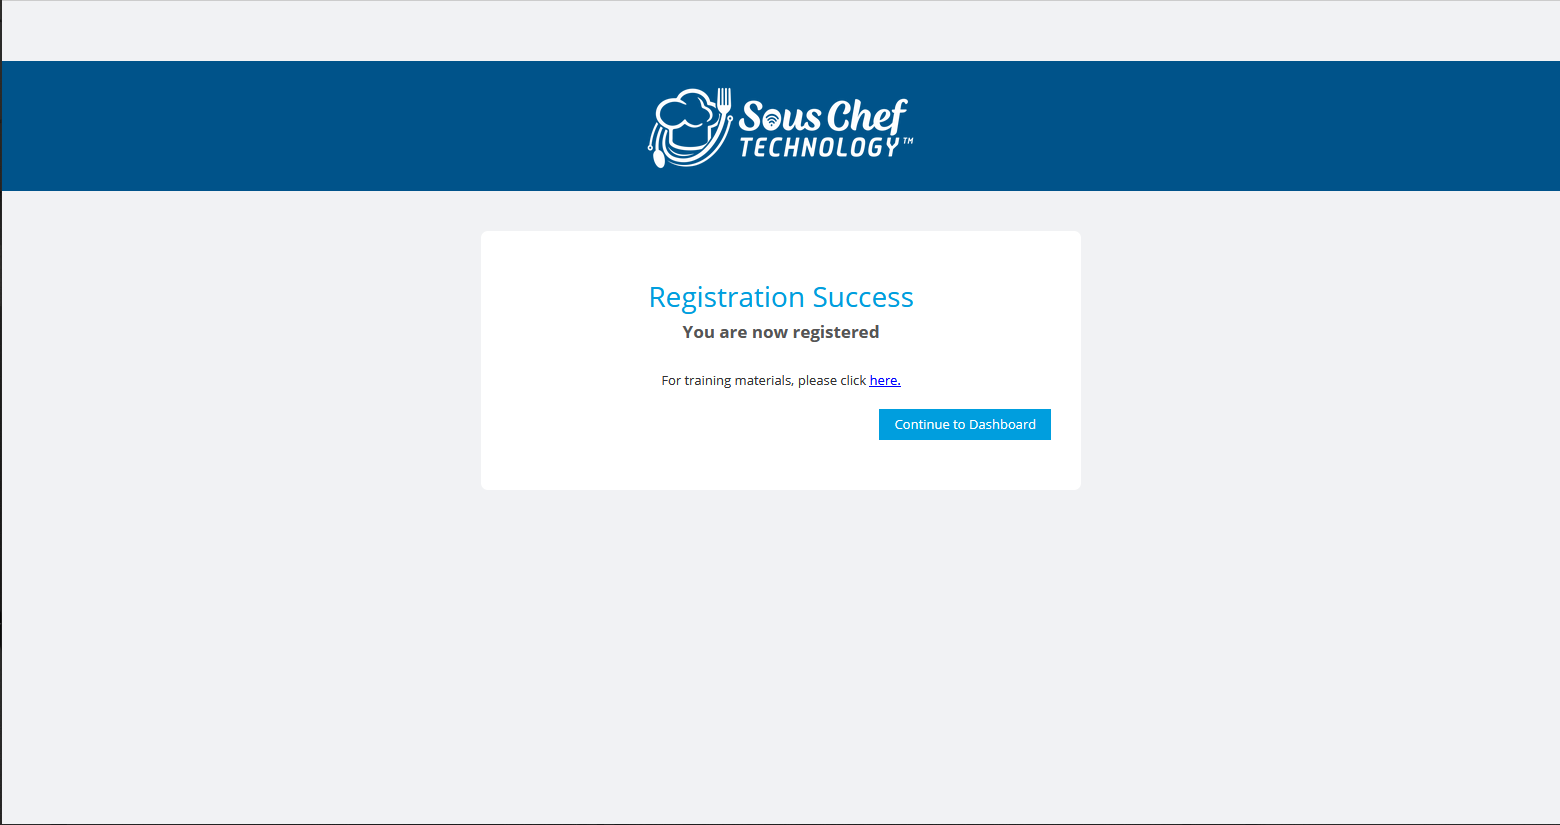
Step 6 - Registration Success
Your account has now been created, and equipment has been registered. A registration success page will appear as below.
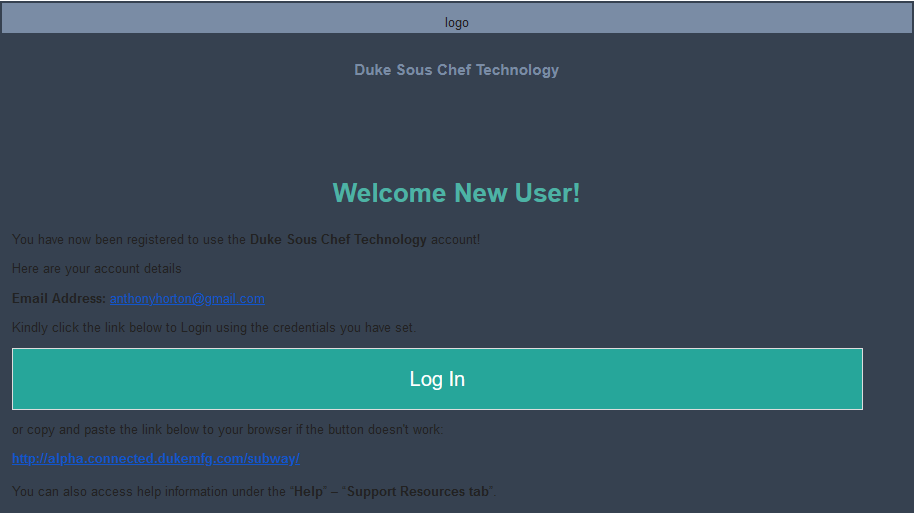
An email will also be sent to the registered email address indicating that the Sous Chef Cloud registration was successful.
Step 7 – Dashboard
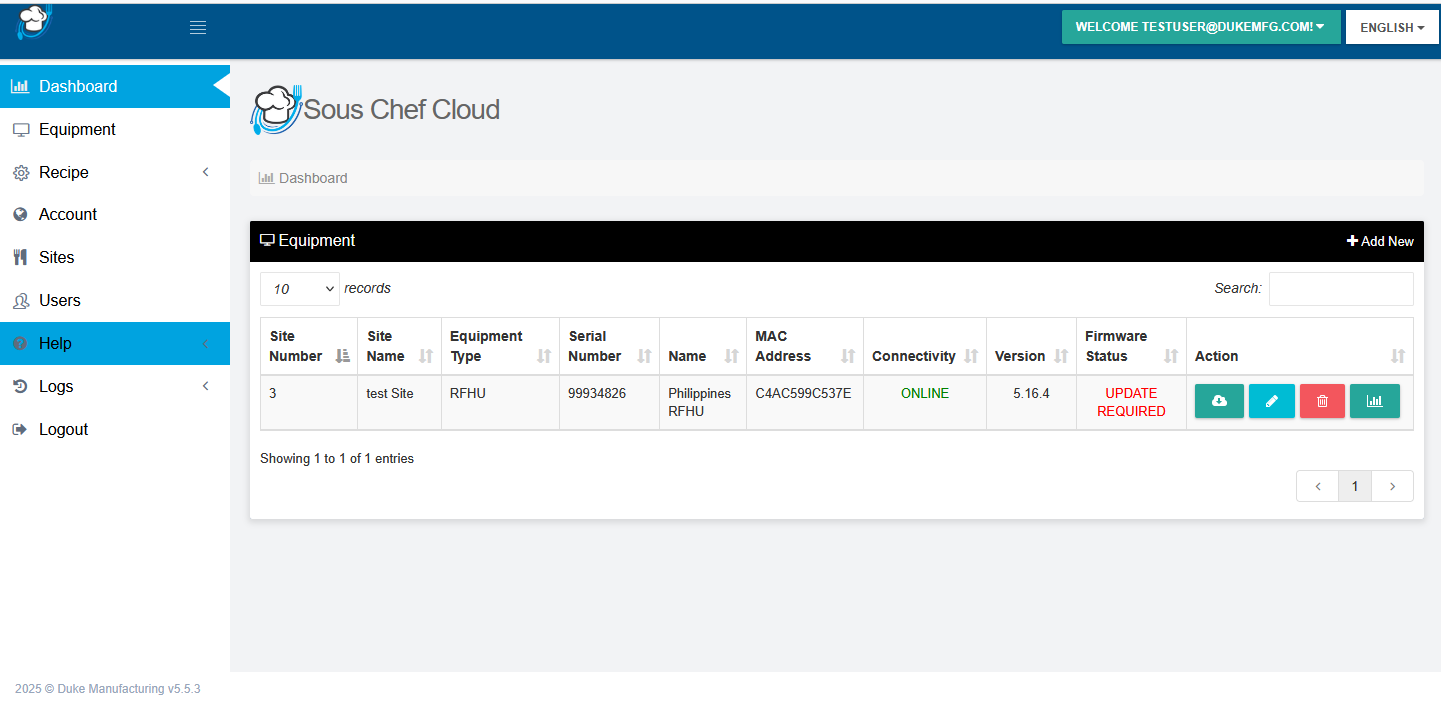
Select the “Continue to Dashboard” option to enter the Sous Chef Cloud dashboard page. You will be automatically logged on with your newly registered user. Training materials can also be accessed from this page. Once logged in you will have the ability to remotely update recipes and view diagnostic information. Additionally you will have the capability to, register new pieces of equipment and add managers as users to accounts.
SOUS CHEF CLOUD – USER GUIDE
1 – Overview
After the registration process has been completed you will now be able to log into the Sous Chef Cloud using the user name and password set during the registration process.
After logging in the Sous Chef Cloud landing page will appear as below. Options available to you are available on the left hand side master menu.

You will have access to:
- 1) Viewing and editing your account details.
2) Edit the details of the site created during the registration process.
3) Add new sites and assign equipment to these sites.
4) Register new equipment.
5) Edit existing equipment.
6) Select any connected equipment within your account and view current recipe settings and active recipe
7) Access Help material such as training manuals and videos.
8) Add new users at your access level or at a lower level users with limited functions compared to your user.
2 – Account
During the registration process your account has been created. Your account details can be modified if necessary.
1. To edit your account first select the “Accounts” menu on the master menu. Your Account information will appear. See below.
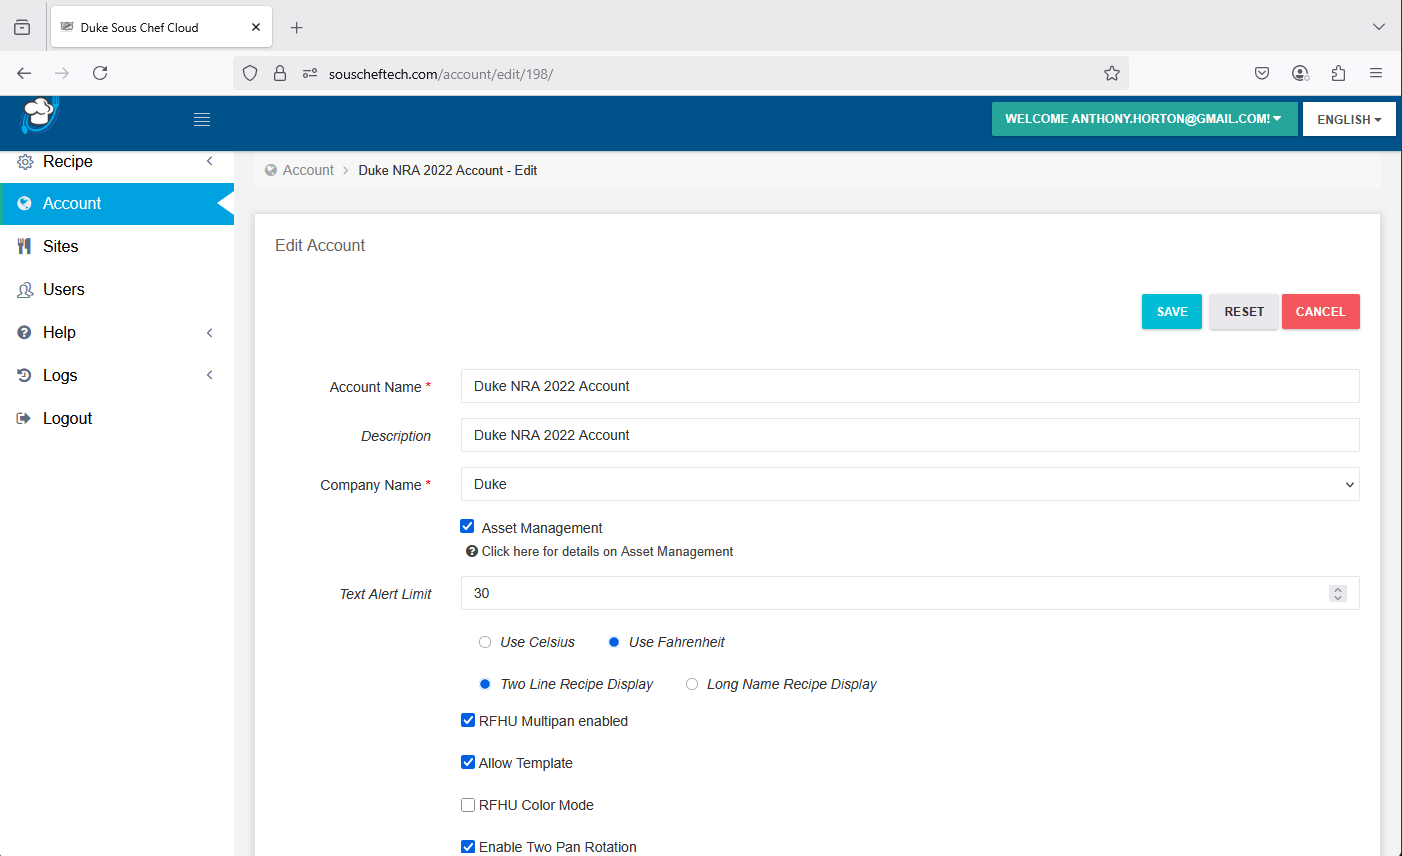
2. Make any required changes and click save to save the new account changes.
1. To edit your account first select the “Accounts” menu on the master menu. Your Account information will appear. See below.

2. Make any required changes and click save to save the new account changes.
3 – Sites
The Sites menu allows you to add, delete and edit sites. The site created during the registration process will appear here. Equipment that is already registered or new equipment can be assigned to a site. To access Sites follow the steps below:
1. Select Sites from the left hand side master menu. Active sites available within the current account will be displayed. See below.
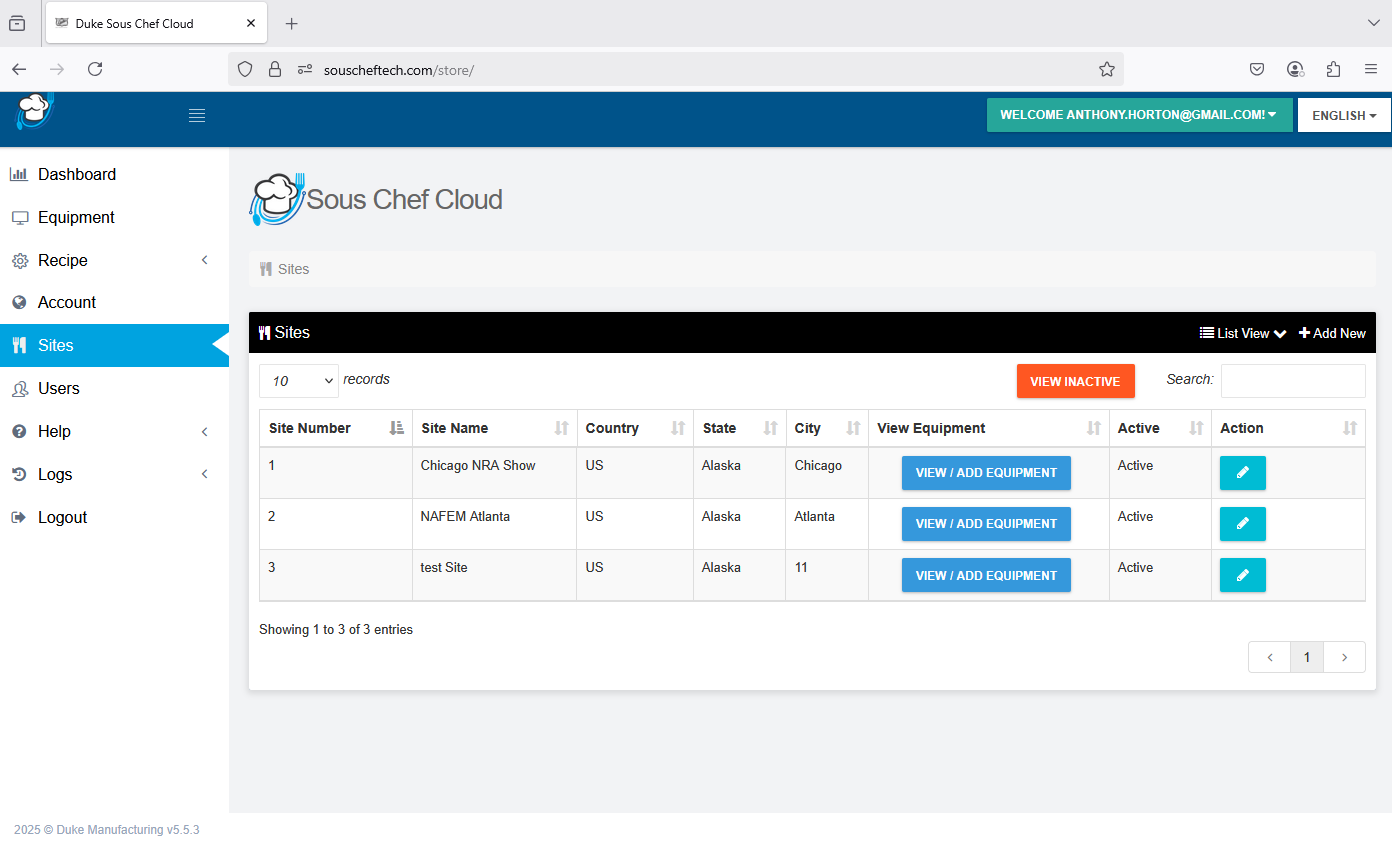
2. To add a new site select “Add New”. To edit an existing site select the (edit) icon..
3. When add or edit site is selected the following add/edit form will appear.
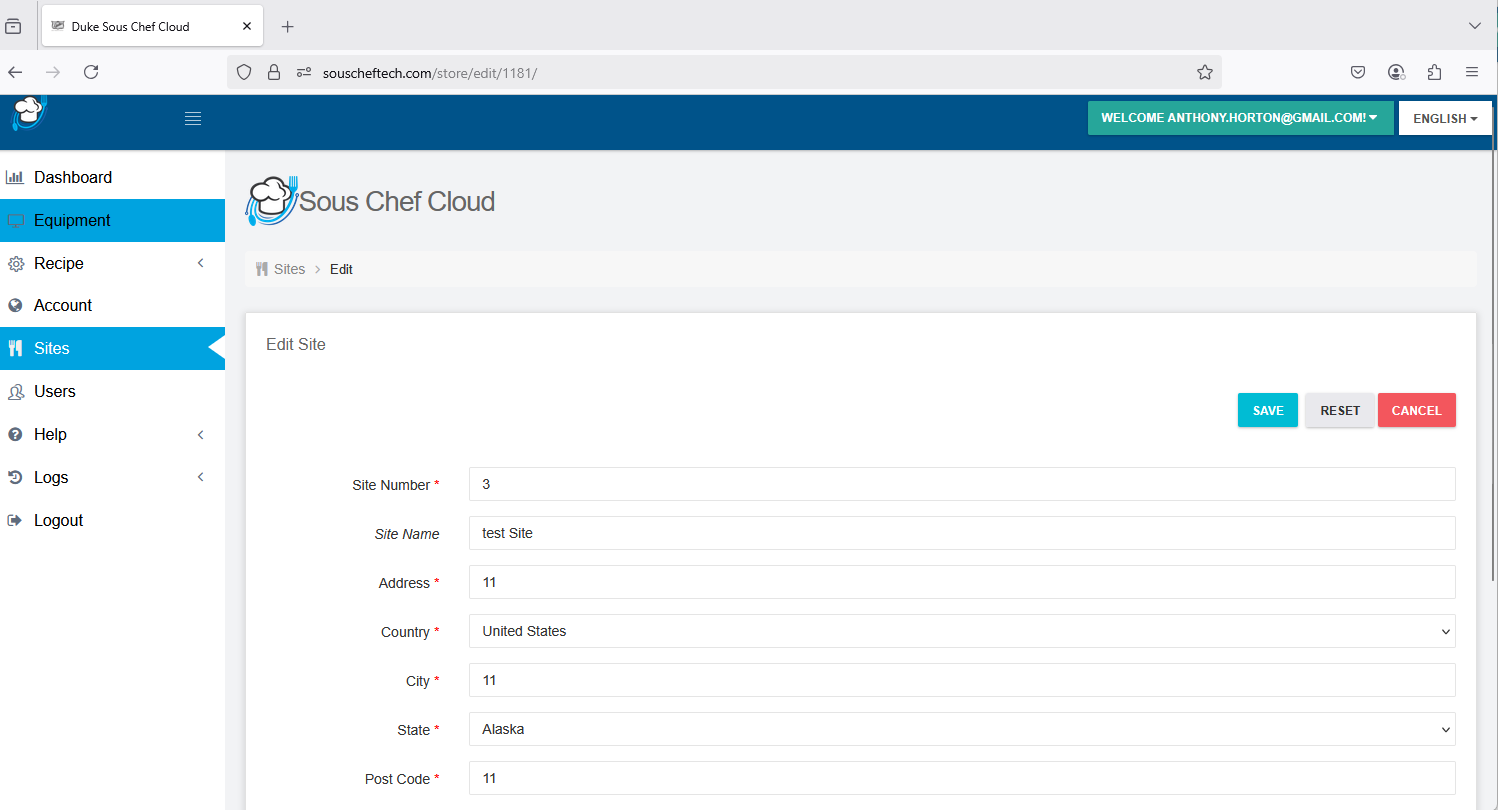
4. Enter the new or updated site details. Other required information for the site are site number, the site's address and phone number. Optional fields that can be entered are the site name and the contact details. Any required fields are prefixed with a *.
5. When finished making the necessary adjustments select save.
6. You will be returned to the site list.
4 – Equipment
The Equipment screen will list your currently registered equipment within your account. Equipment connectivity status will be displayed. As a registered user you will be able to edit, delete and add new equipment. You will also be able to link your equipment to a site. Access to certain equipment for certain users can also be controlled within Users which will be detailed in a future section.
1. Enter the Equipment option on the left hand side master menu.
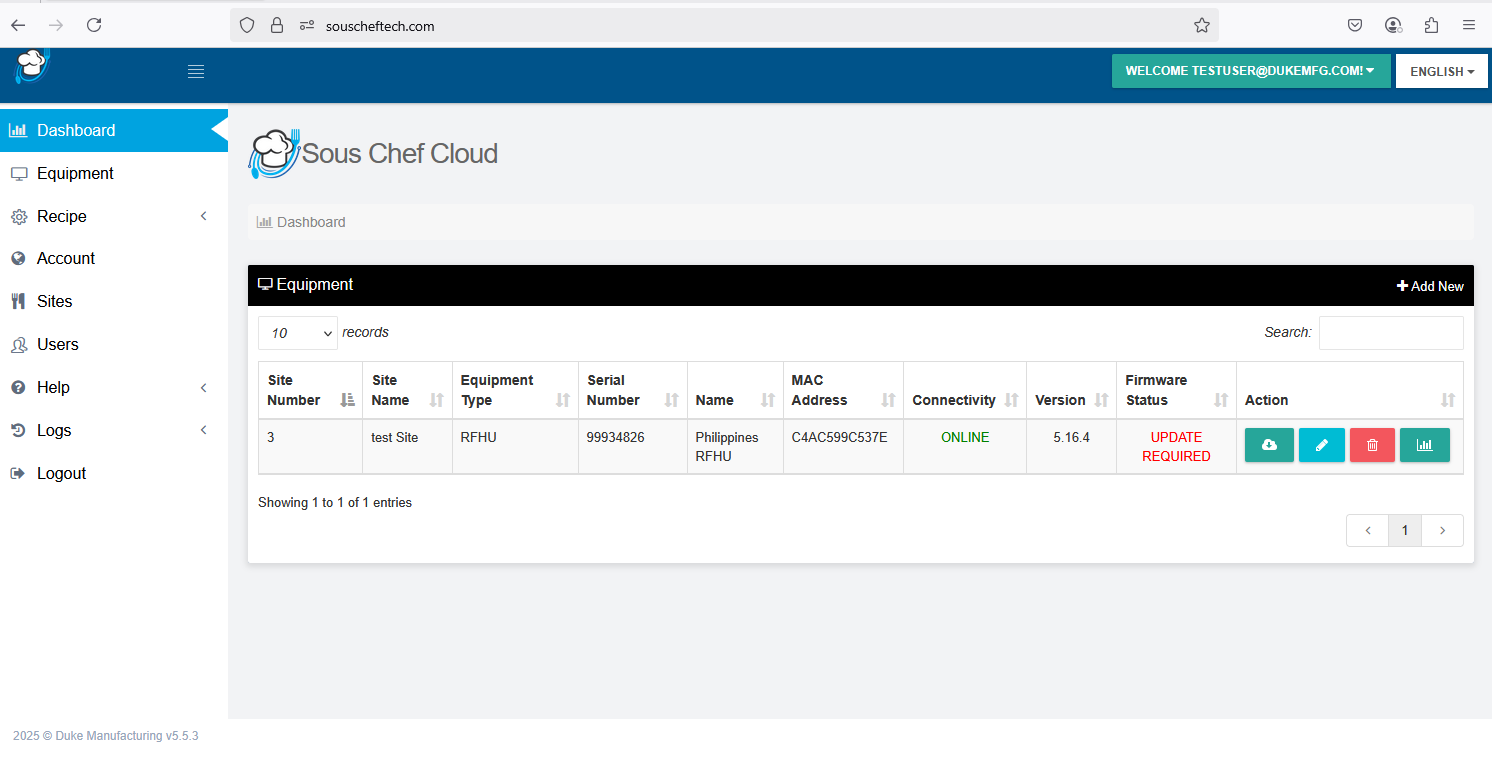
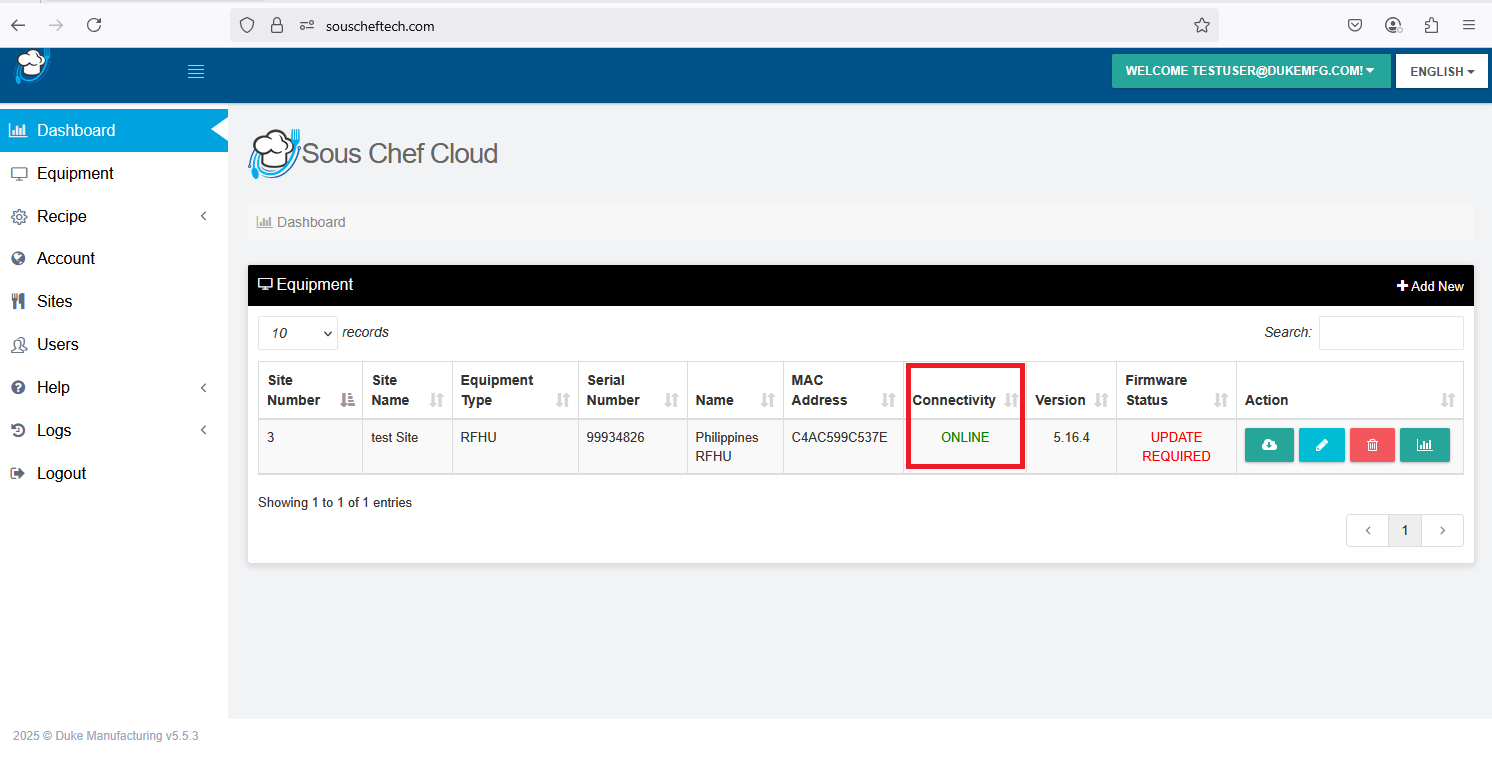
2. A list of existing equipment within your account will appear. The “Connectivity” column below will indicate if the equipment is either online or offline. See below:
3. To edit equipment details select the edit icon.
When editing equipment the following information gained during the registration process will not be permitted to be modified.
• Equipment Type
• Serial Number
• MAC Address
The edit equipment screen appears below:
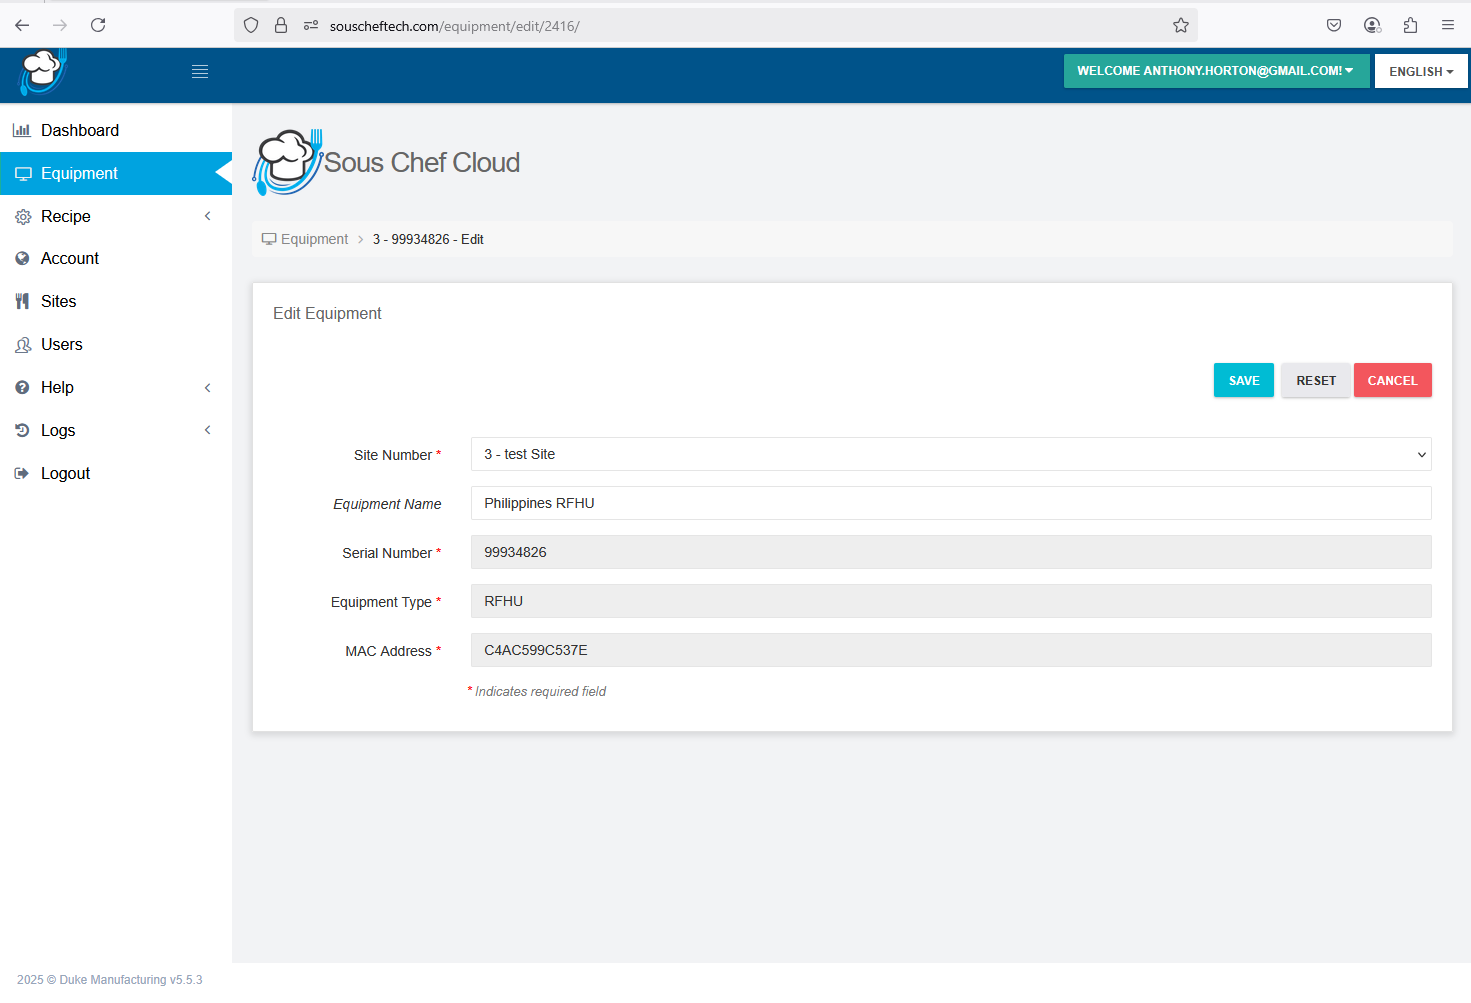
4. Make any changes to the existing equipment and choose Save. You will now be returned to the equipment list screen.
5. To register new equipment select the “+ Add New” button.
6. Select “+ Add New” option to add new equipment. The following screen will appear.
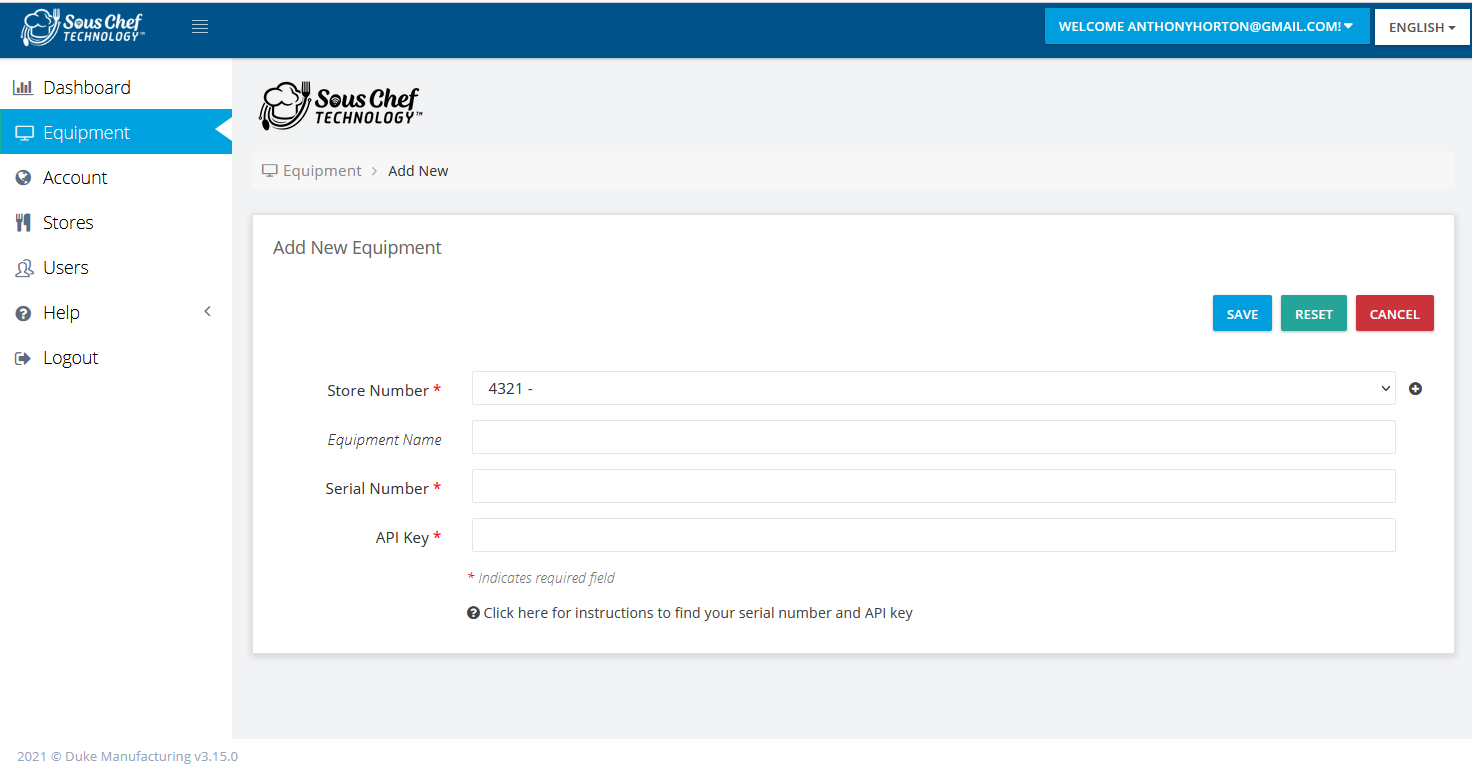
7. You are able to register new equipment through this entry screen.
8. To add new equipment first select the site that the equipment will be assigned to. If the desired site does not exist you can select “+” next to the site number field to load the site creation page.
9. Following site selection the equipment can be named as a user friendly name if necessary. This is optional.
10. Lastly enter a matching serial number and API key. When registering new equipment the same serial number/API validation that occurs during the registration process will take place to ensure only valid equipment is added to the account in terms of a matching serial number and API key.
Checks are in place to ensure already registered equipment cannot be added a second time. When the serial number and API key have been entered choose SAVE to add the new equipment.
11. You will be returned to the equipment list page with the new equipment added.
5 – Users
During the registration process a user has been created. The access level of this user is called a “role admin” user. All functions previously described such as Sites and Equipment is available to you.
You also have the option to create lower-level users called “role users”. These users are more restricted and are only able to access equipment that you have given them access to. They are only allowed to visit the Dashboard page of the selected equipment. Options such as add/edit/delete of Sites and Equipment is not allowed.
To access Users to make user modifications follow these steps:
1. Select Users from the left hand side master menu.
The users screen will open.
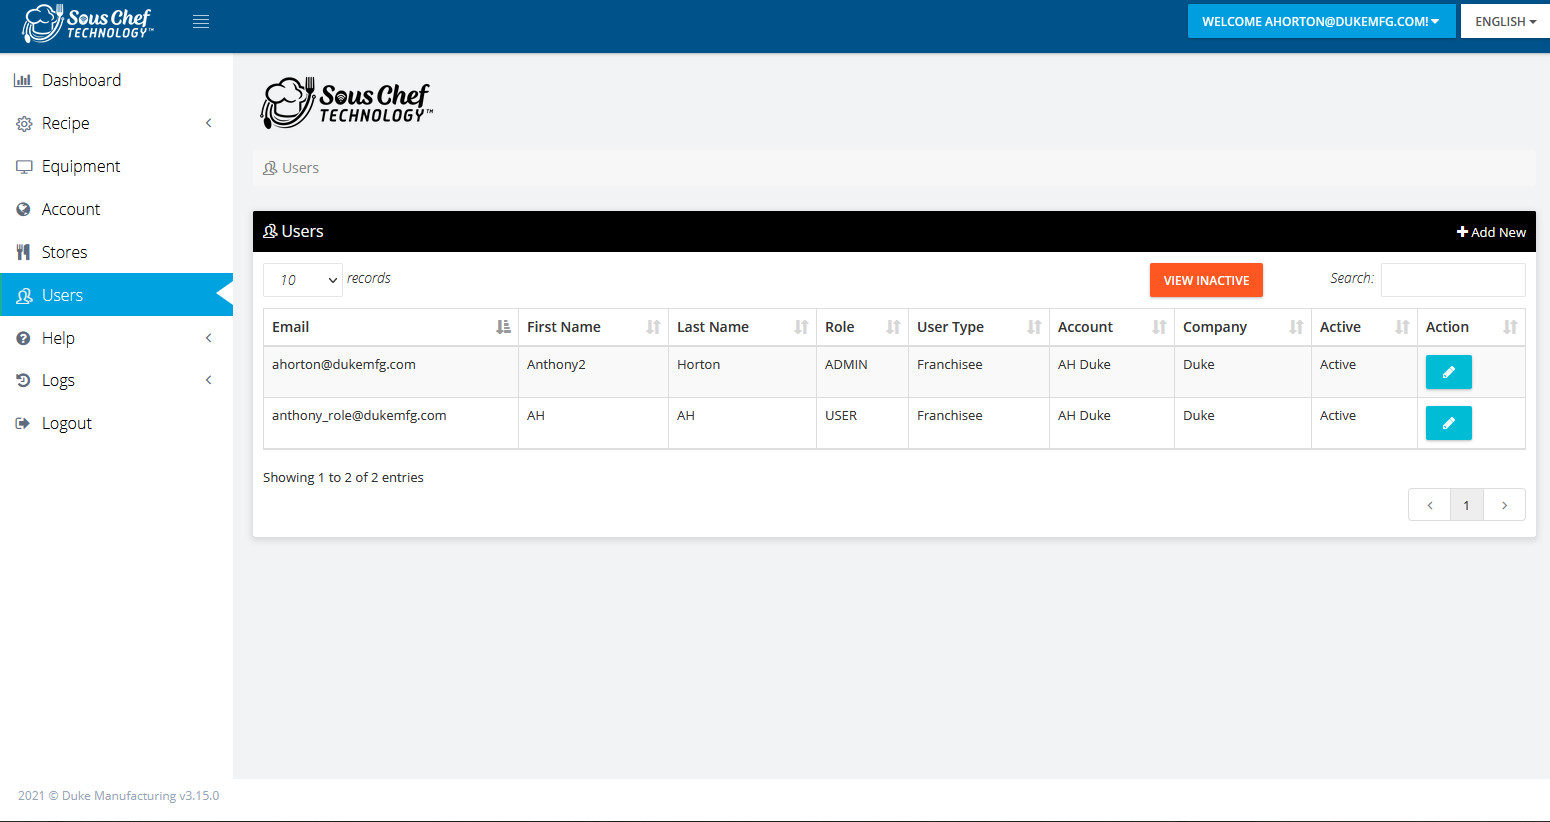
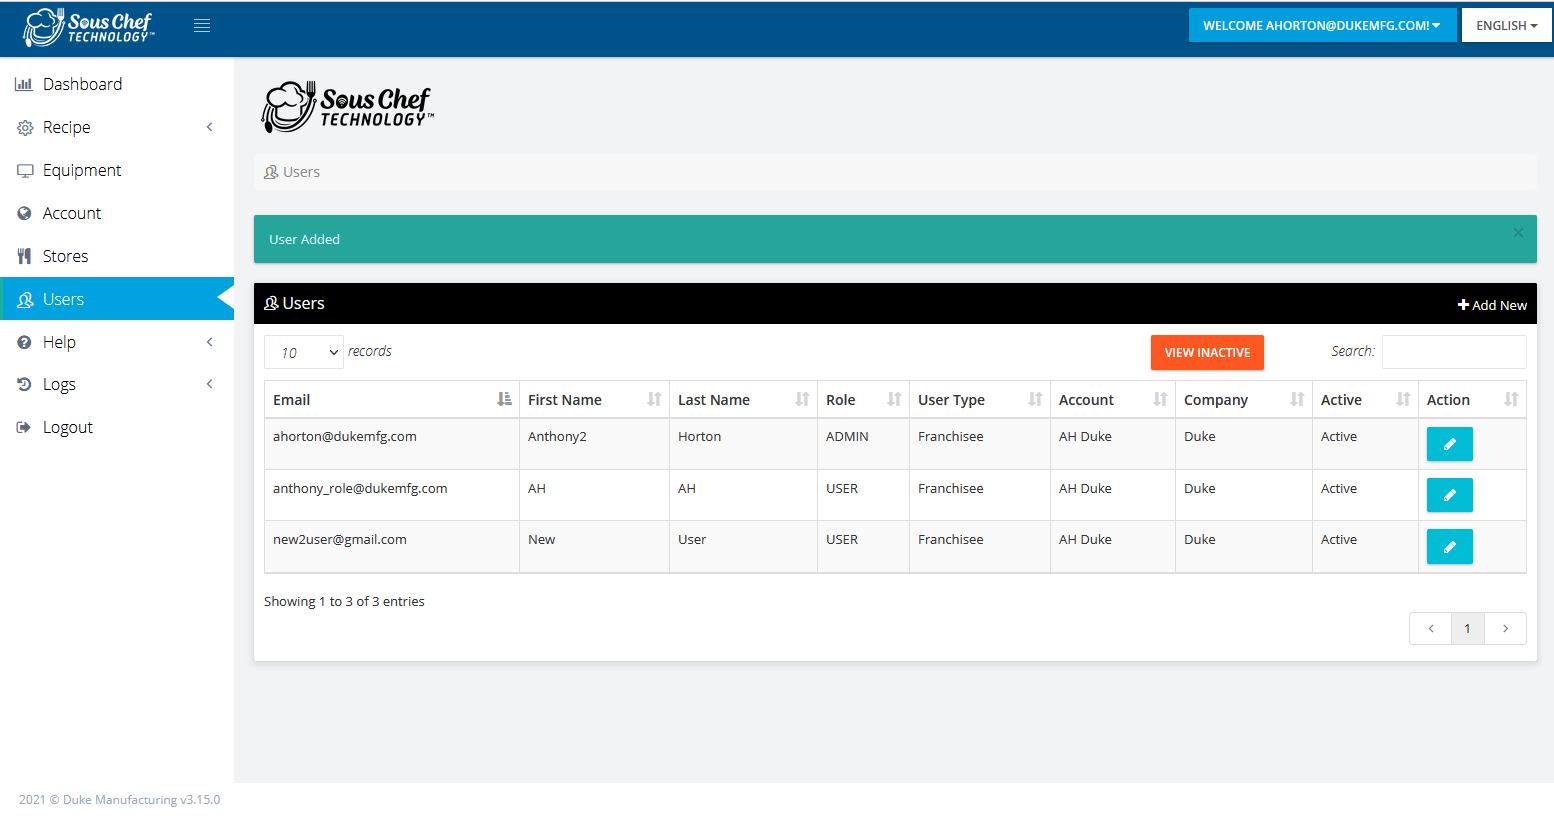
Upon registration only one user will exist for the account. This is the user you created during the registration process.
Within this page you able to add new users and edit existing users.
2. To add a new user select “+Add New”. The following create user form will appear.
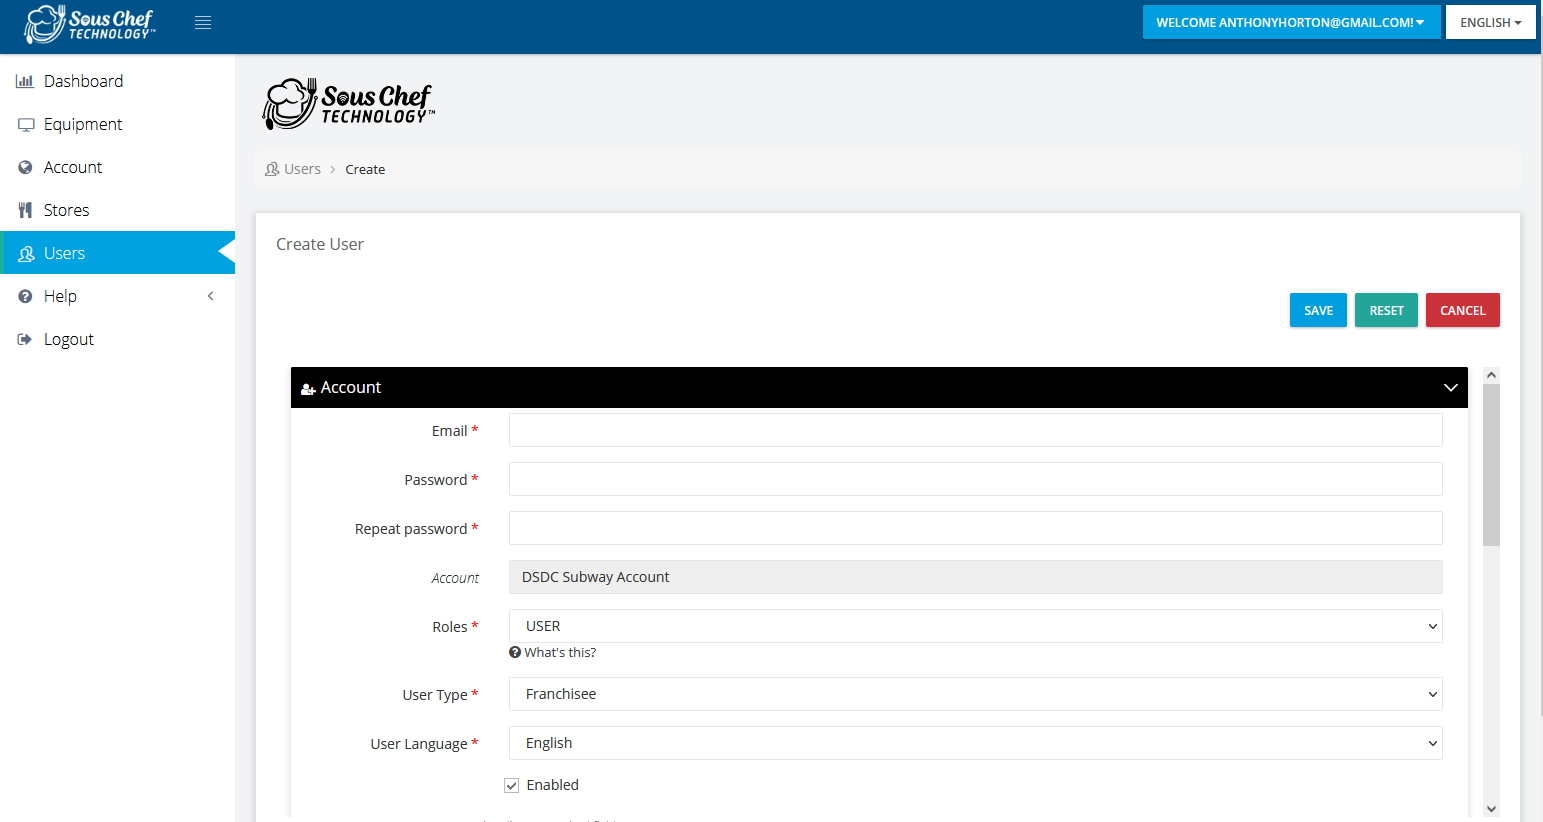
3. To add a new user first enter the email address along with the password.
An account selection combo box will appear but this account value cannot be changed.
The user role can be set to one of two access levels. The first being another role admin user which is the same level as your current user.
Alternatively a role level user can be created which allows this user to only view their allowed sites and equipment along with access to the Diagnostics/Dashboard section of the equipment (providing the equipment is connected).
4. The next section is the profile section. This will require the first name and last name of the user to be entered. Enter the first name and last name of the user.
5. The last section will display the site access. See below:
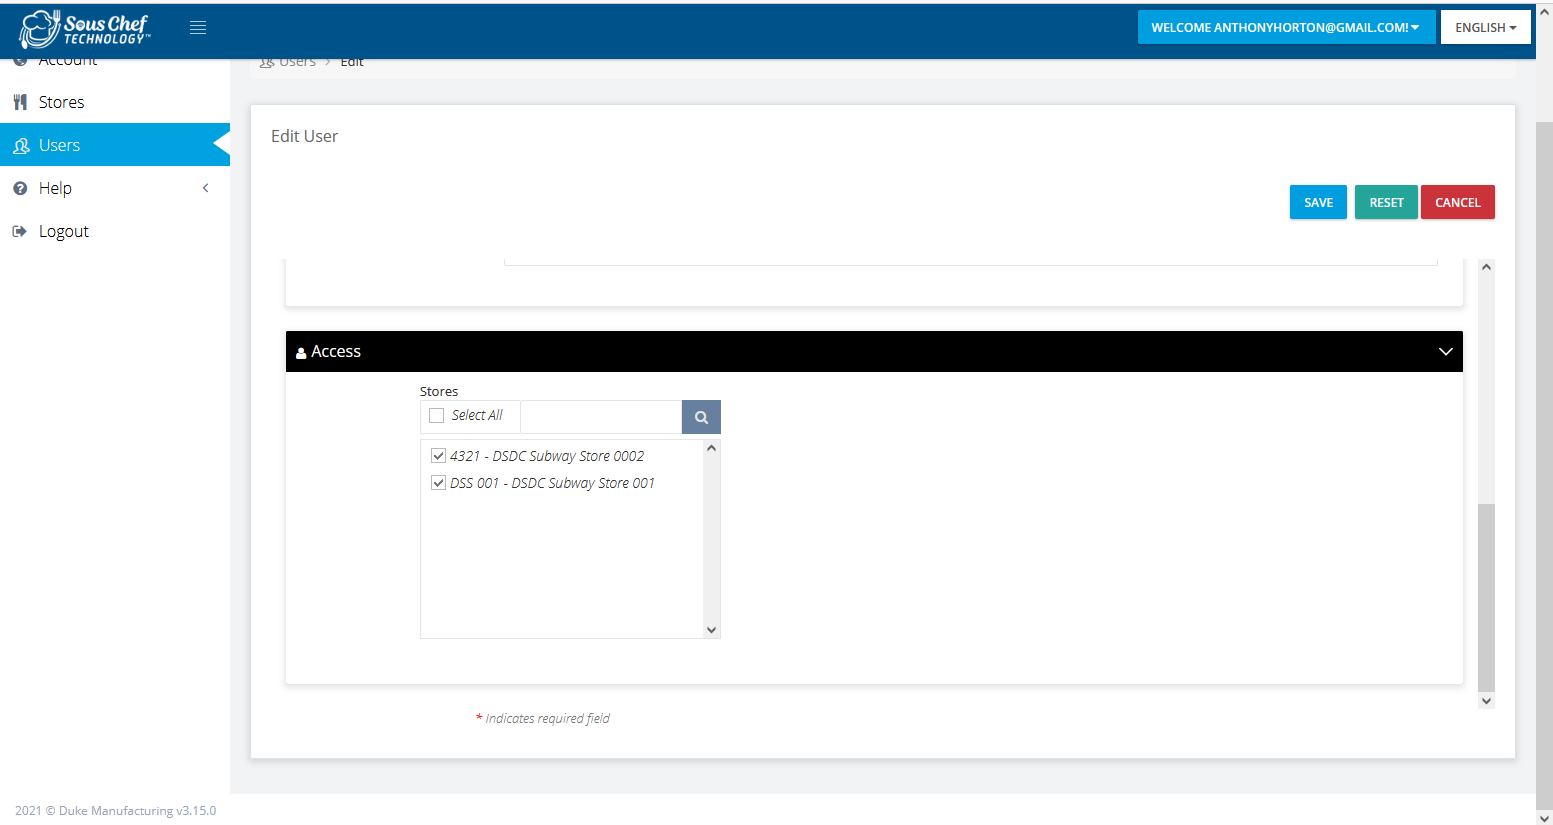
6. Select the desired access of the sites by selecting the appropriate item using the checkboxes.
7. When finished select save to save the sites access. You will be returned back to the user list screen. The user list screen will be updated to also display the new user. See below.
6 – Role User Login
After creating a role user, the role user can now login into the Sous Chef Cloud.
1. Provide the role user their email address and password.
2. The role user will login and have access to a restricted left hand side master menu. See below.
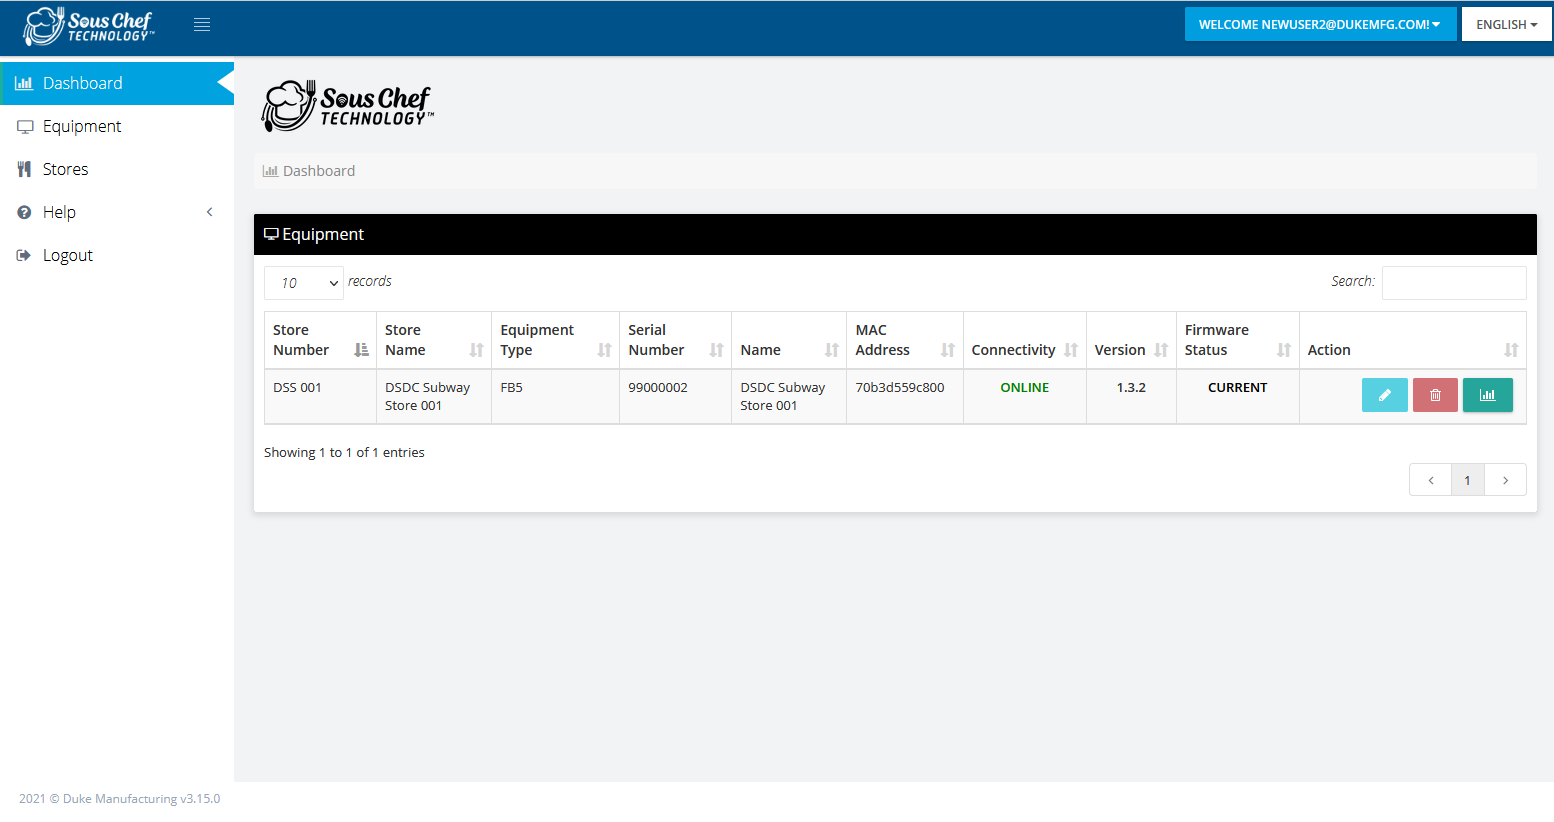
Access for a role user is limited to Sites and Equipment only. Any entries within Sites and Equipment the role user has access to cannot be edited – only viewed.
The role user can also access the Equipment dashboardl screen after selecting the equipment.
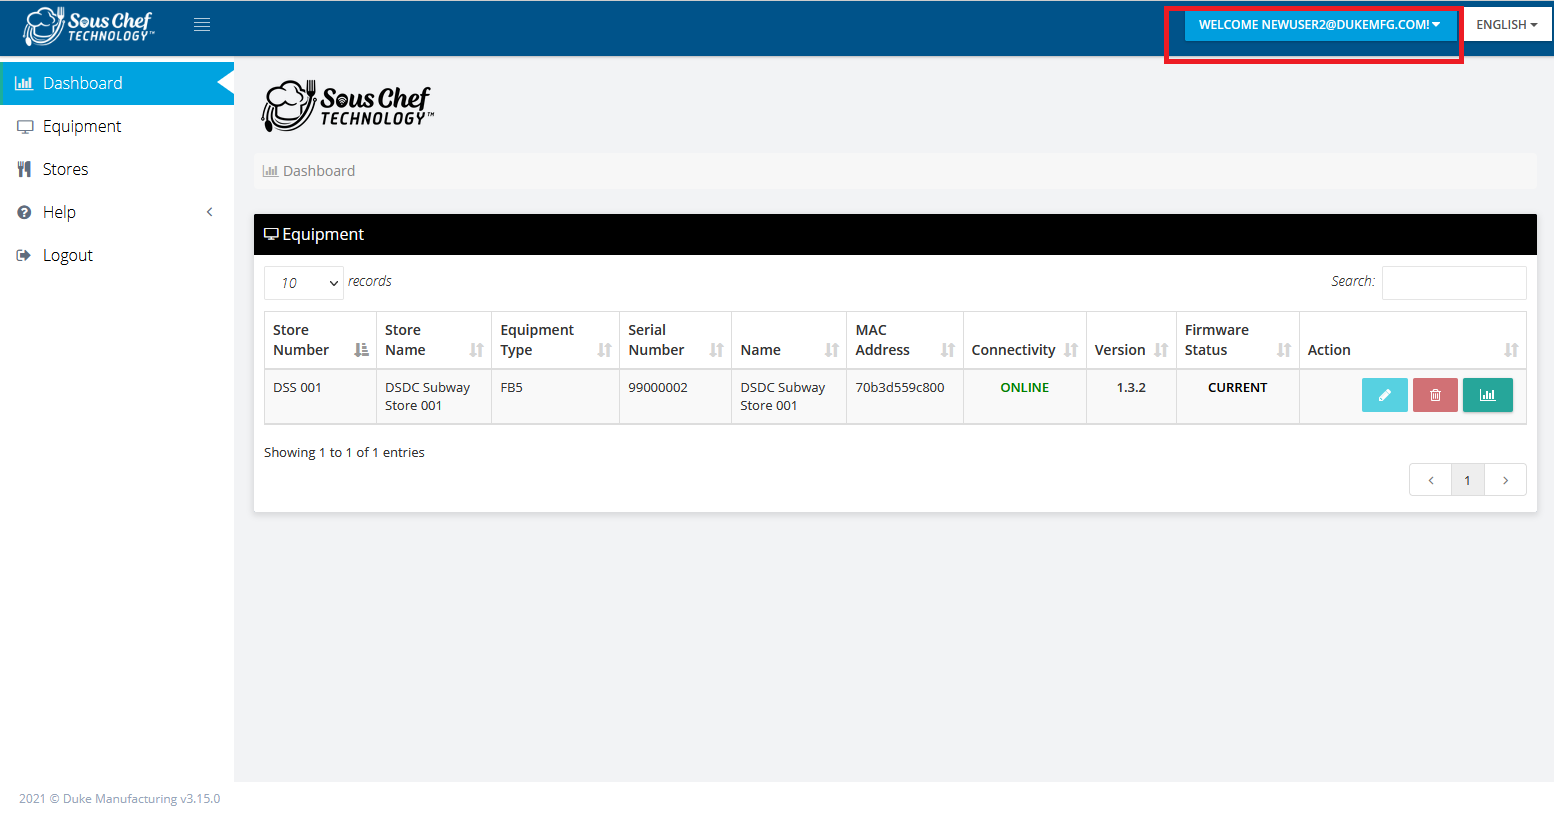
3. If necessary the role user can change their password by selecting the “WELCOME role_user@dukemfg.com” box in the right hand top corner of the screen. See below:
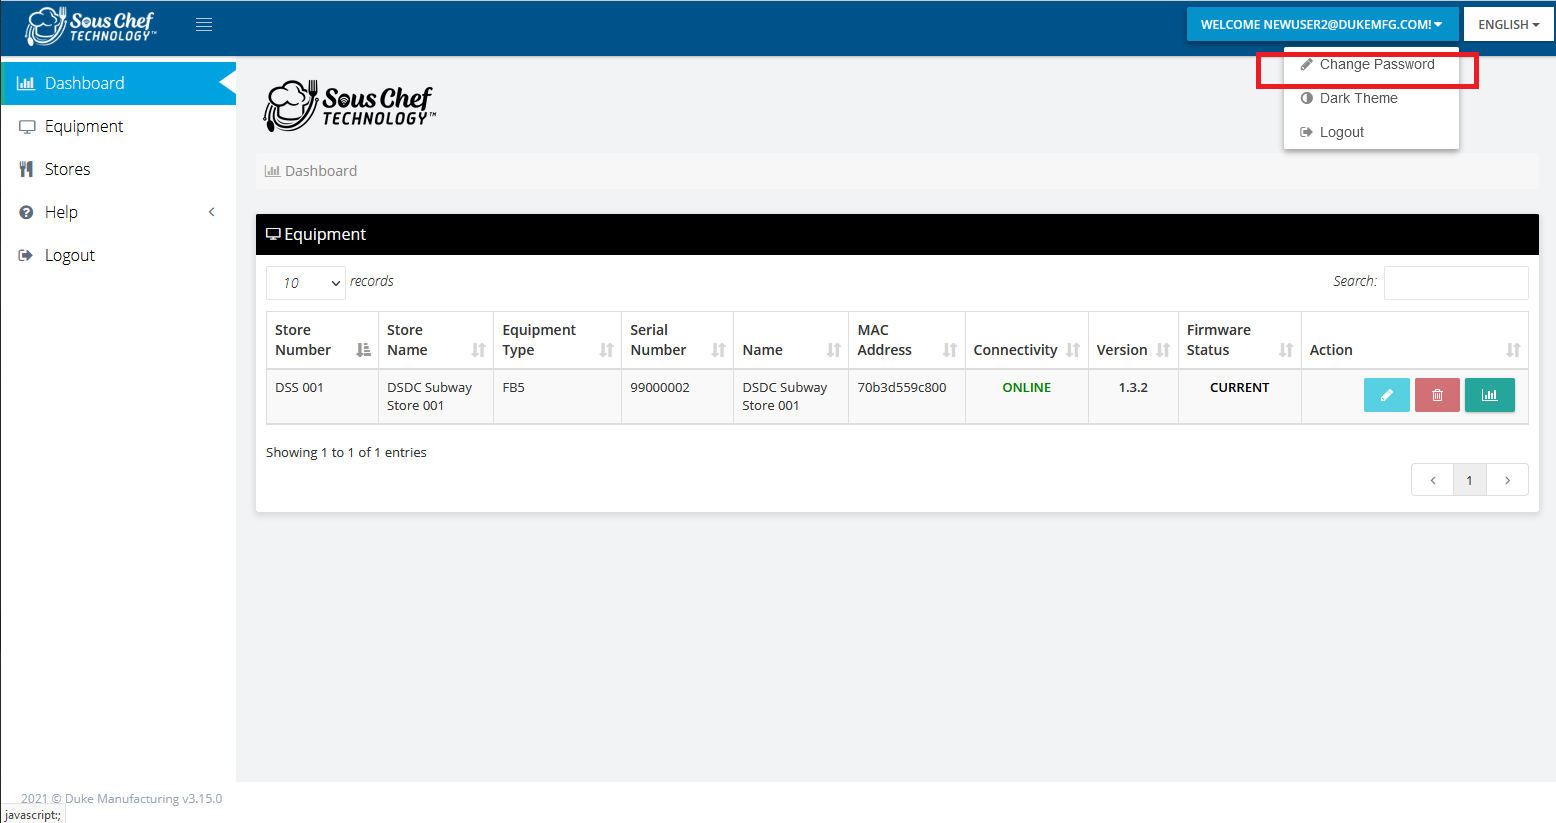
4. After selecting the drop down a change password option will appear. See below.
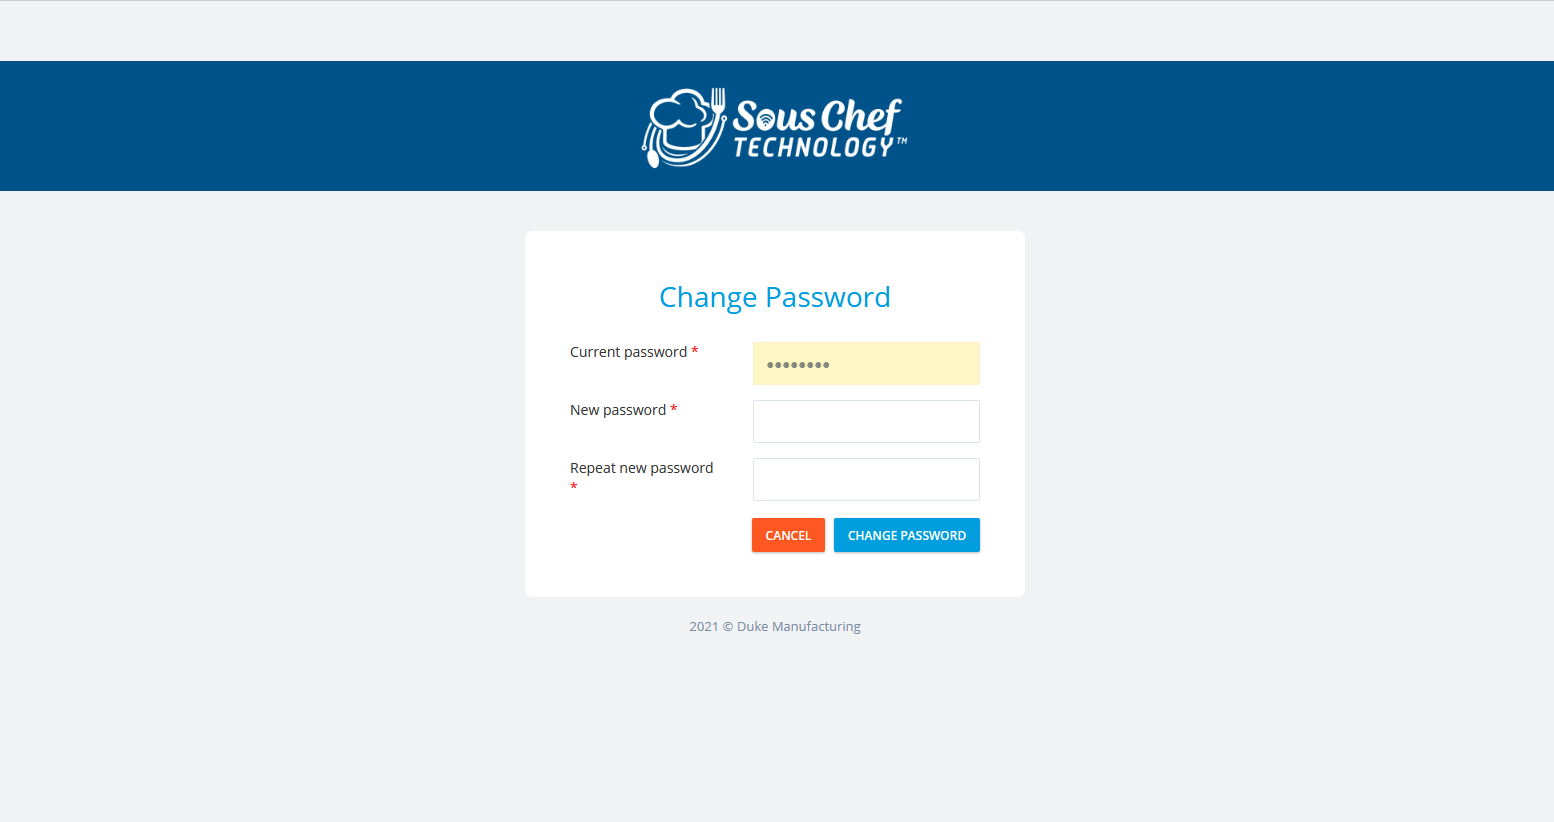
5. Select the Change Password box. The change password screen will now appear.
7 – Help – Support Resources
A number of support materials are available on the Sous Chef Cloud.
1. To access first click on Support Resources. This will load the Support Resources page which will display any available videos or manuals. See below.
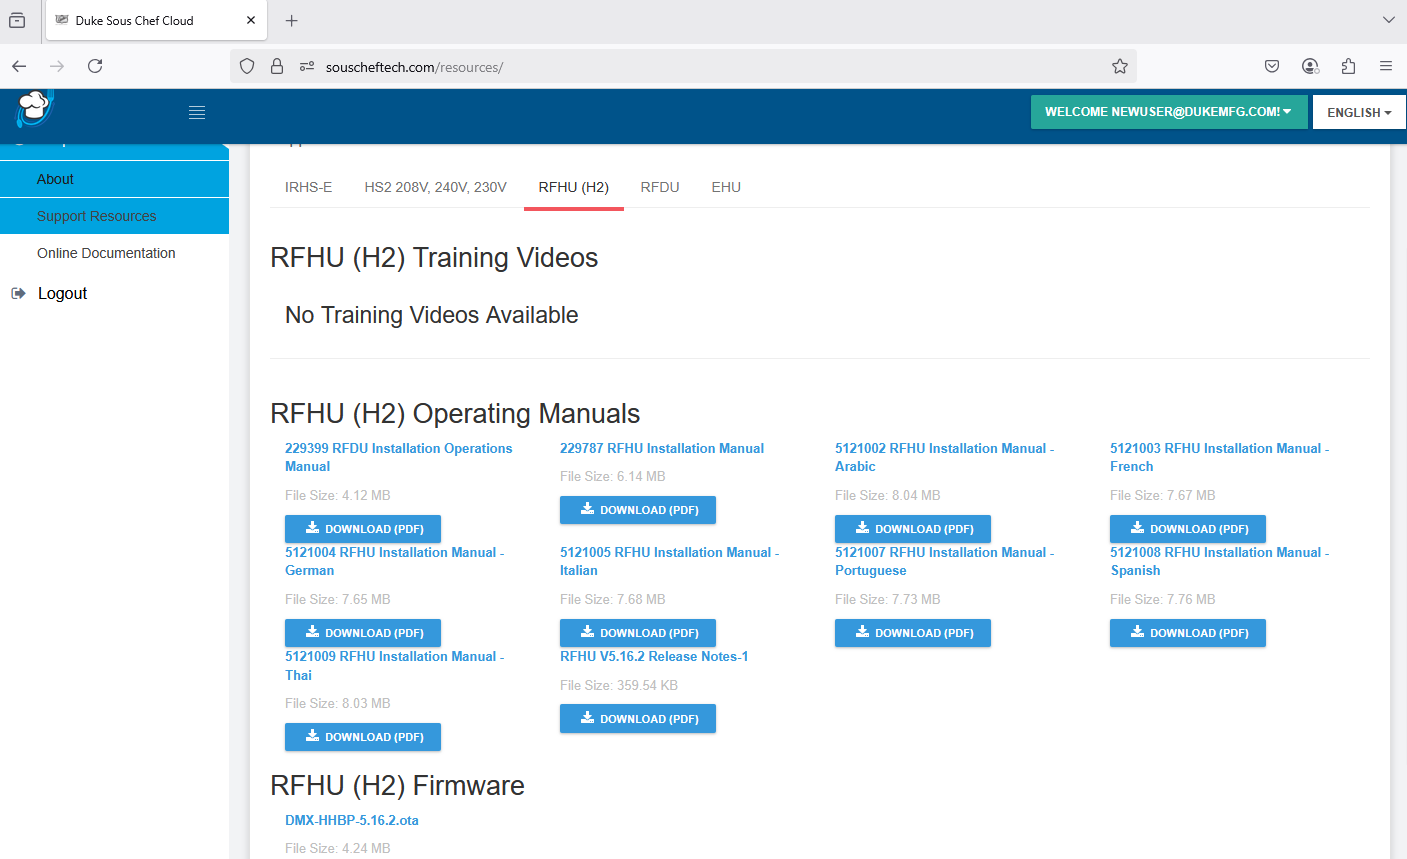
2. Any training materials and videos available to your user level will appear here.
3. To view a video click the “play” icon. The video will start to play in a new window. You can also download any videos to your local device for later use.
4. To view a manual click on the manual name. The manual will appear in another window. The manual can also be downloaded to your local device for later reading.
8 - Changing Cloud Language
For changing language, there are two options. The first is to click on the language button in the top right hand corner
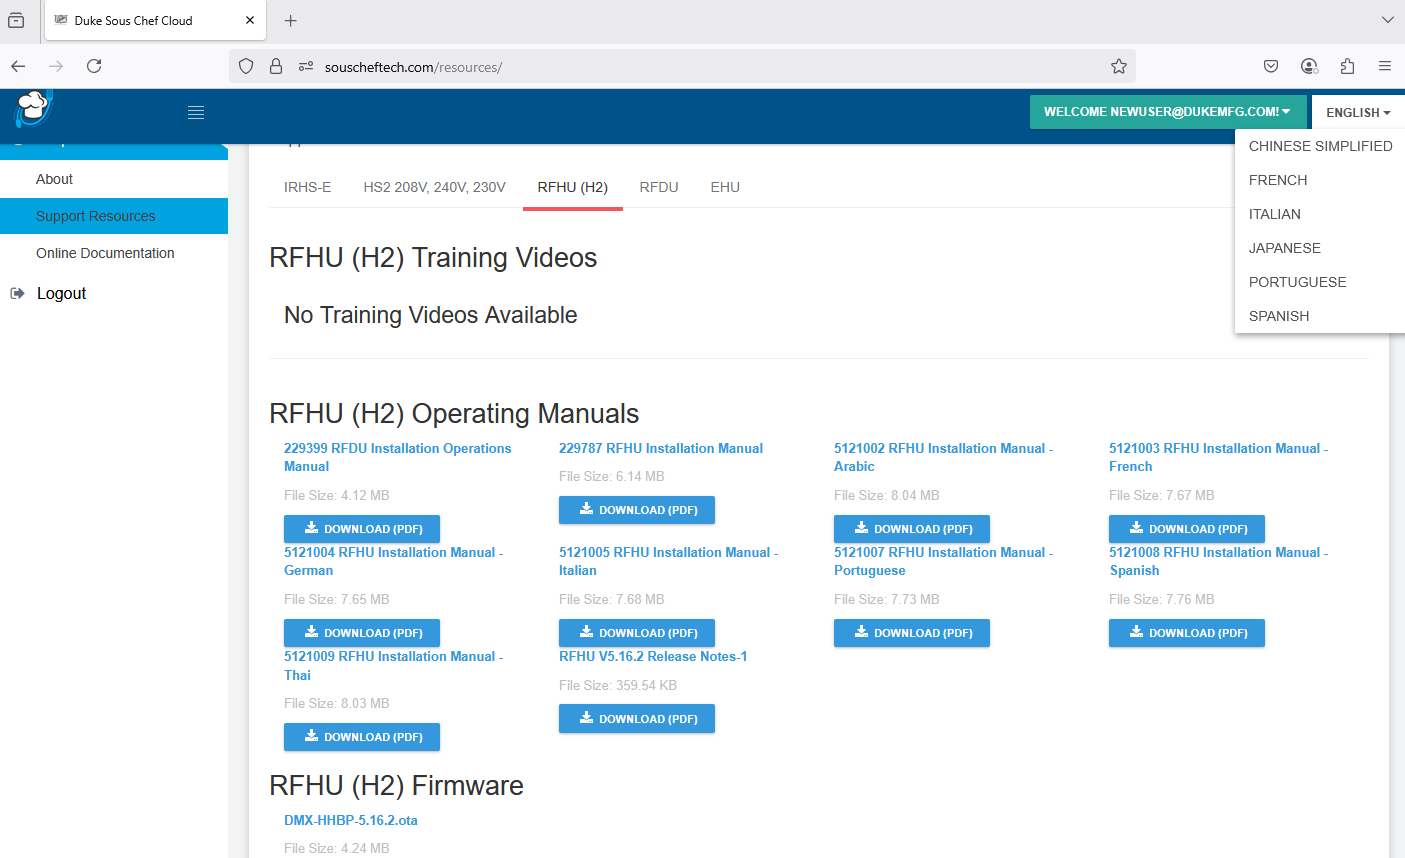
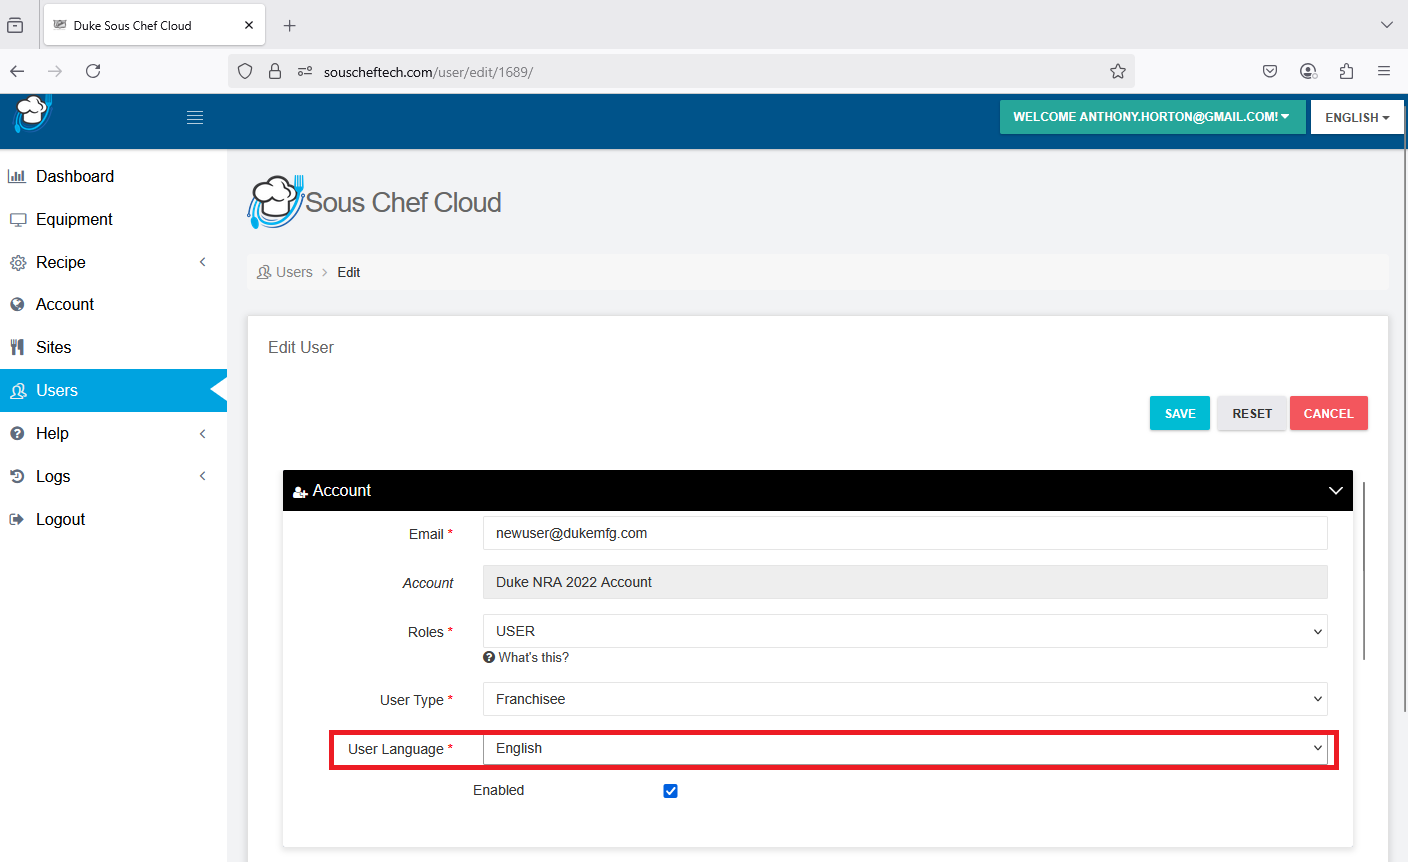
The second is to change within the user settings. First, go to to the Users settinsg. Then, your account will appear on the list click the edit button at the right-side corner.After clicking the edit button look for the setting “User Language” click the box then all the language that sous chef cloud has will appear.
List of Languages available on sous-chef cloud.
• English
• Spanglish
• French
• Italian
• Japanese
• Portugese
• Chinese Simplified
9 - Change Password
If necessary, a user can change their password by selecting the “
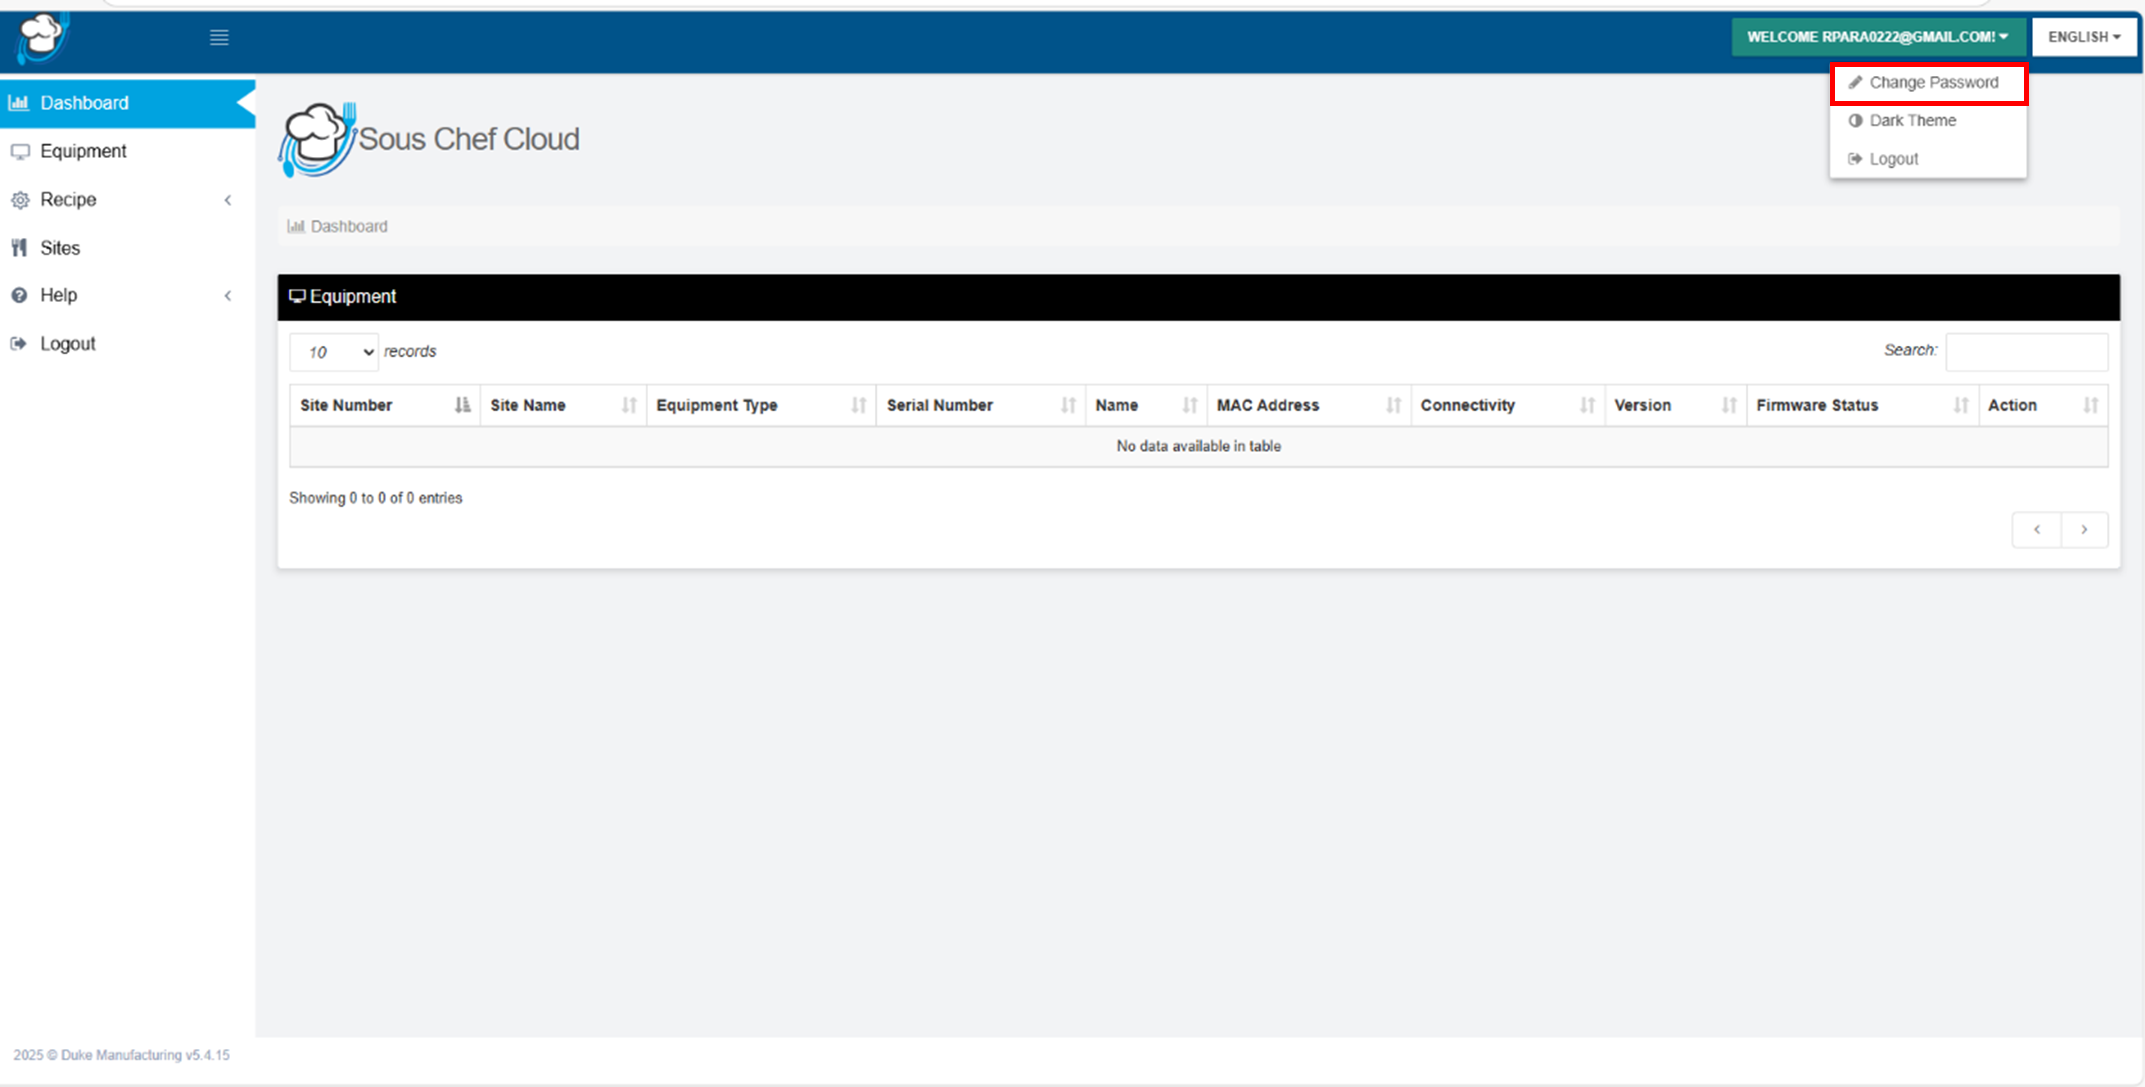
Select the Change Password box. The change password screen will now appear.
10 - ReadyFlex - Adding a unit
For adding RFHU, go to Equipment setting and click on “Add new’’.
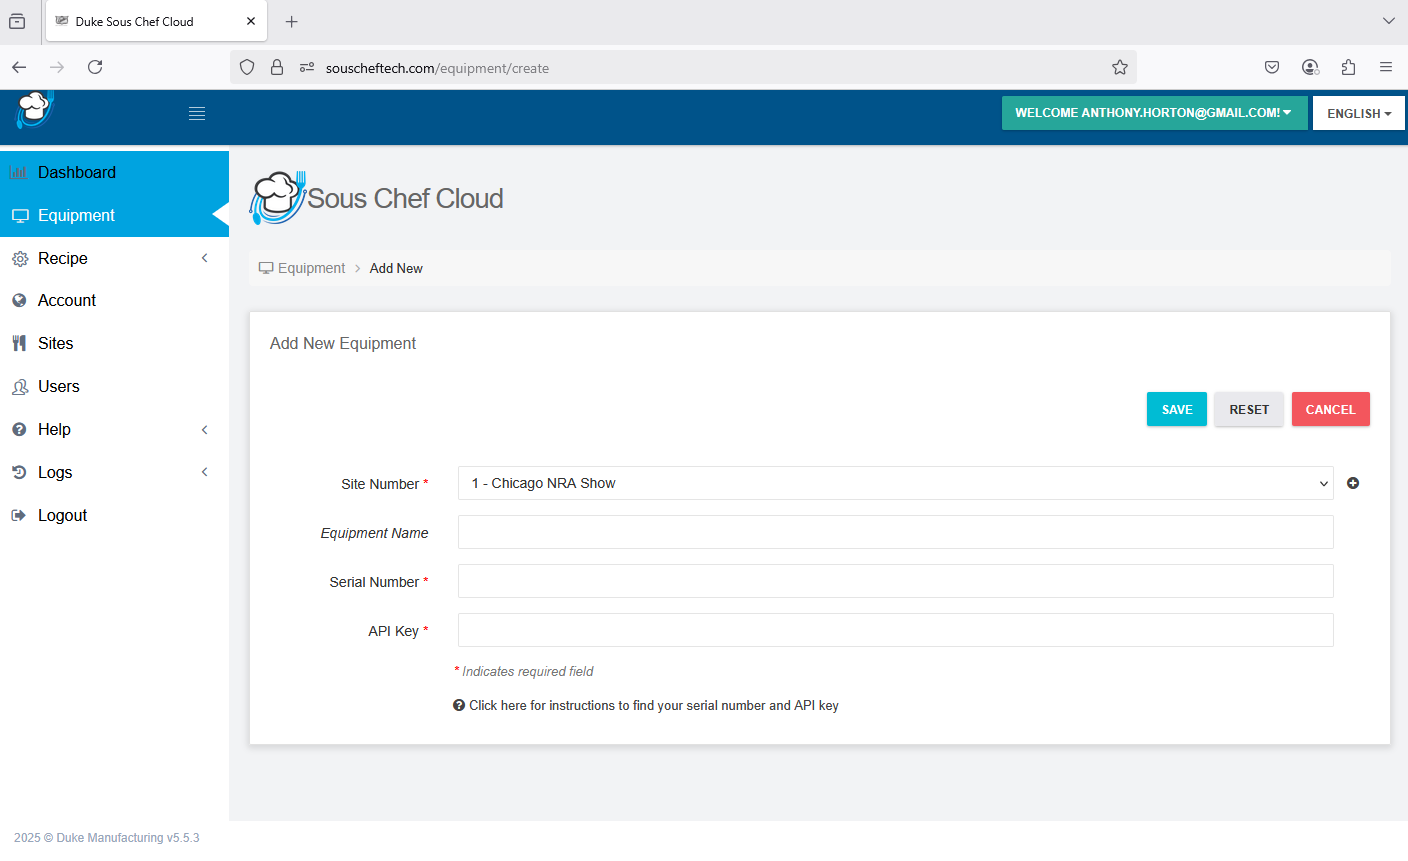
Fill out all the required information including site Number, serial number, API Key.
Then, click save
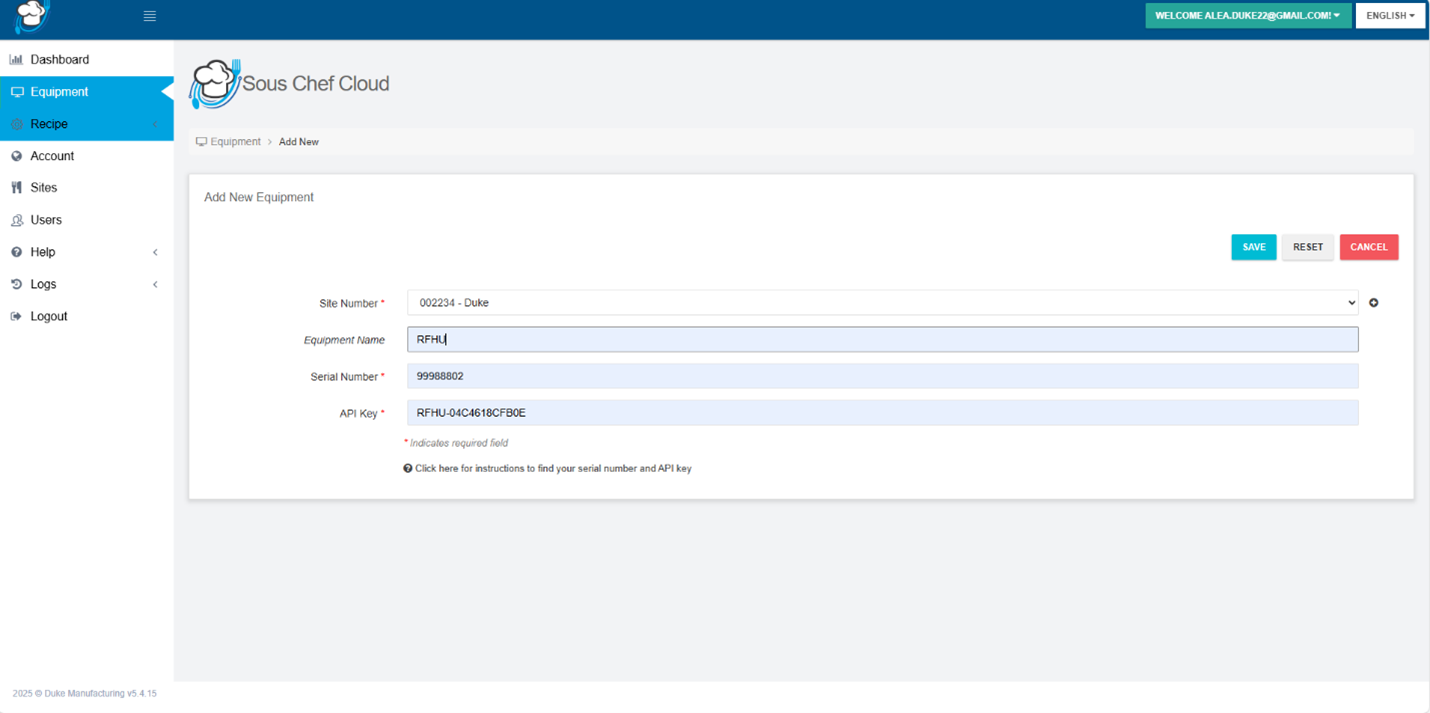
After clicking save button. There will be a notification that will pop-up saying, “Equipment Successfully Registered”.
You will now see that your equipment has been added to the dashboard. Details displayed will be the serial, firmware version and the MAC Address. If the RFHU is detected to be ONLINE by the Sous Chef Cloud the Connectivity will show “ONLINE”. If it’s not detected it will show OFFLINE.
11 - ReadyFlex - Online Programming
After logging onto the Sous Chef Cloud all connected devices within the account will be displayed. Multiple RFHU’s are possible to be loaded within the account.
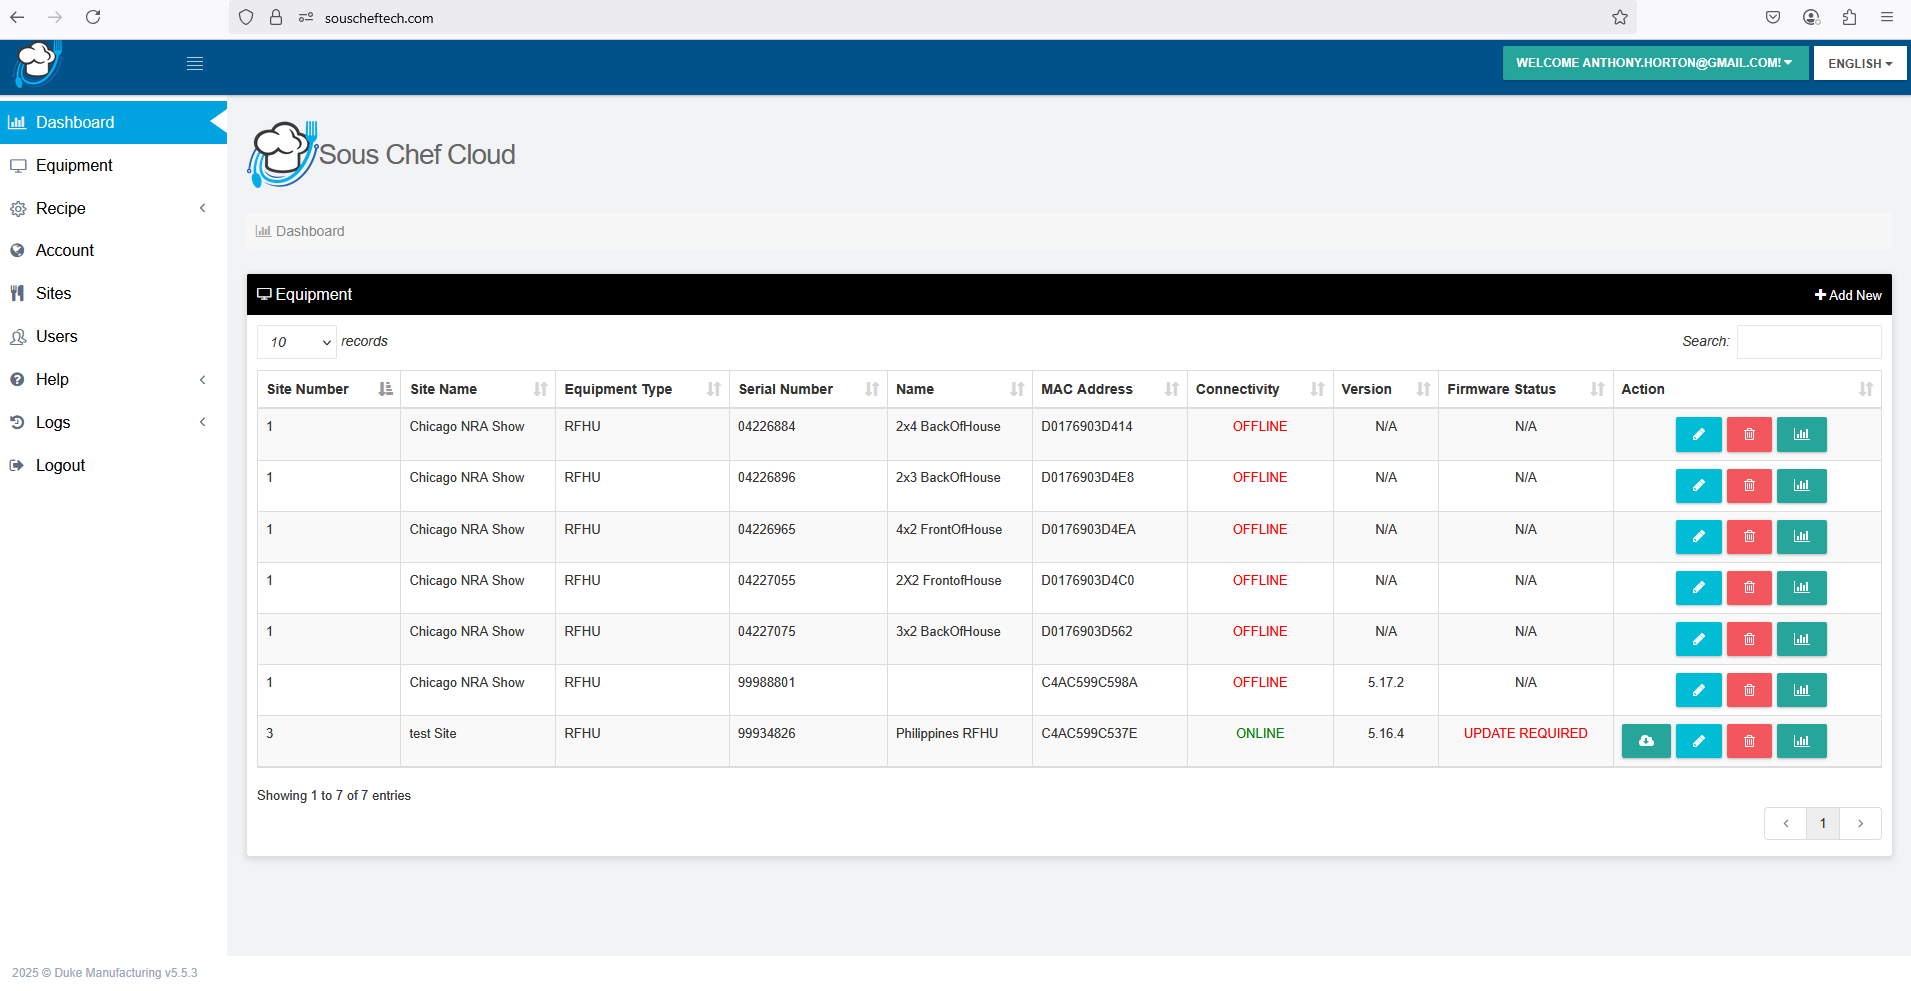
After selecting the “Dashboard” icon to connect to a specific RFHU the programming grid will appear. As this is a connected unit the unit configuration will be detected automatically, for example a 2x2 RFHU configuration appears below
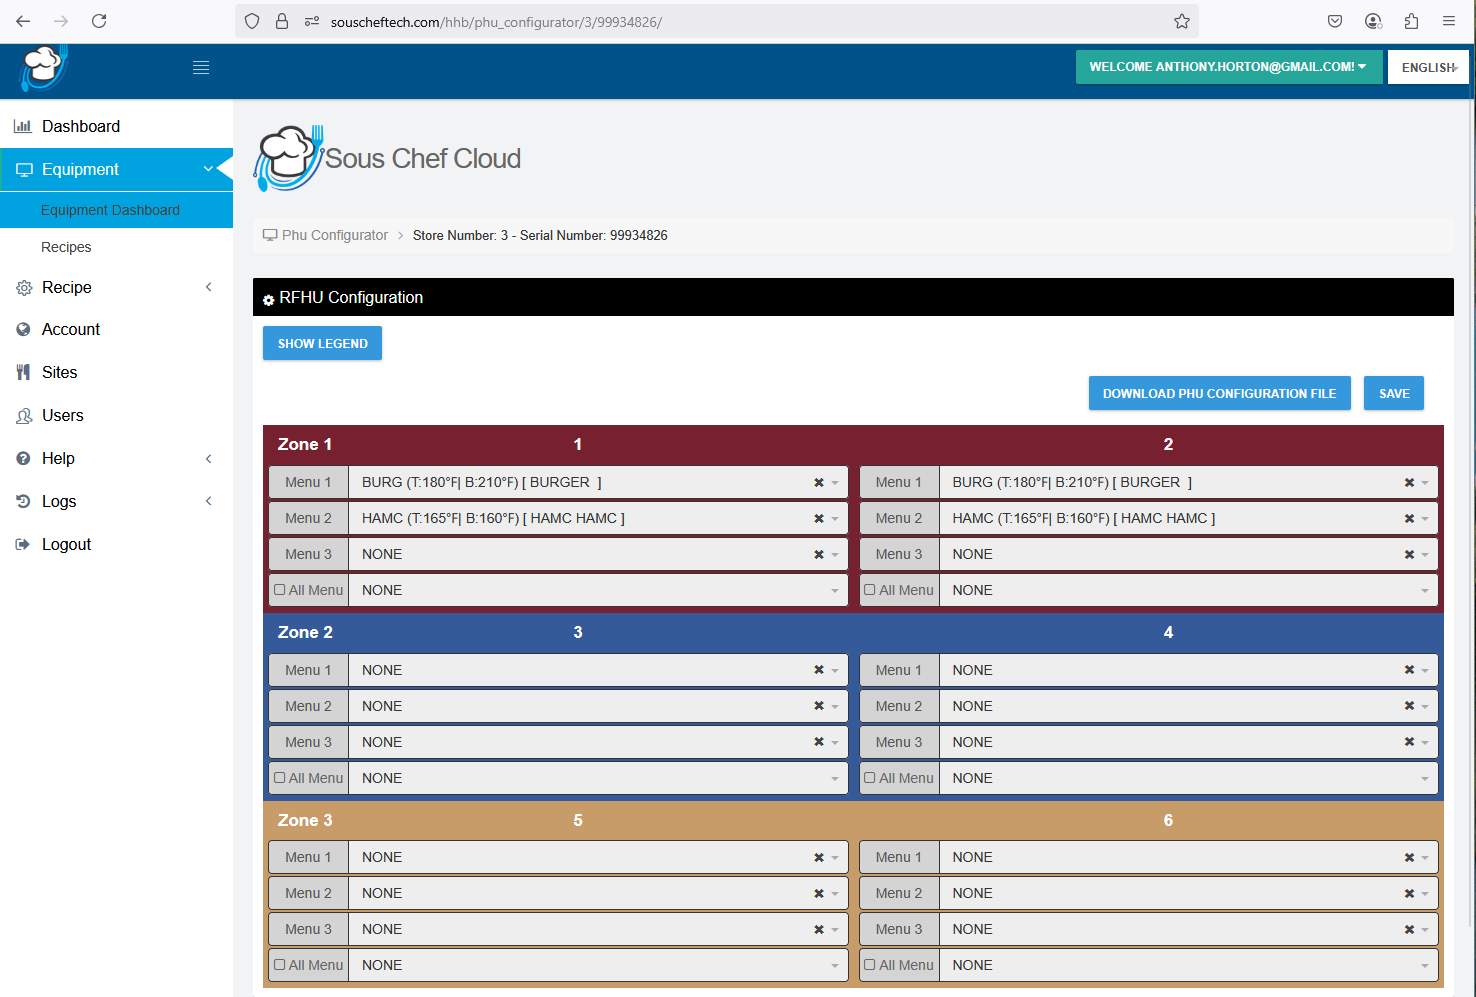
The RFHU programming grid will be color coded per zone. Recipes programmed within each zone will be required to be of the same top temperature and bottom temperature.
Three MENU’s are available for selection for each well. The three menu’s may be used as BREAKFAST, LUNCH or DINNER. The “All Day” option can be used when the well holds the exact same recipe for the entire day.
To program a well select the dropdown boxes next to each MENU. A list of available recipes will be displayed.
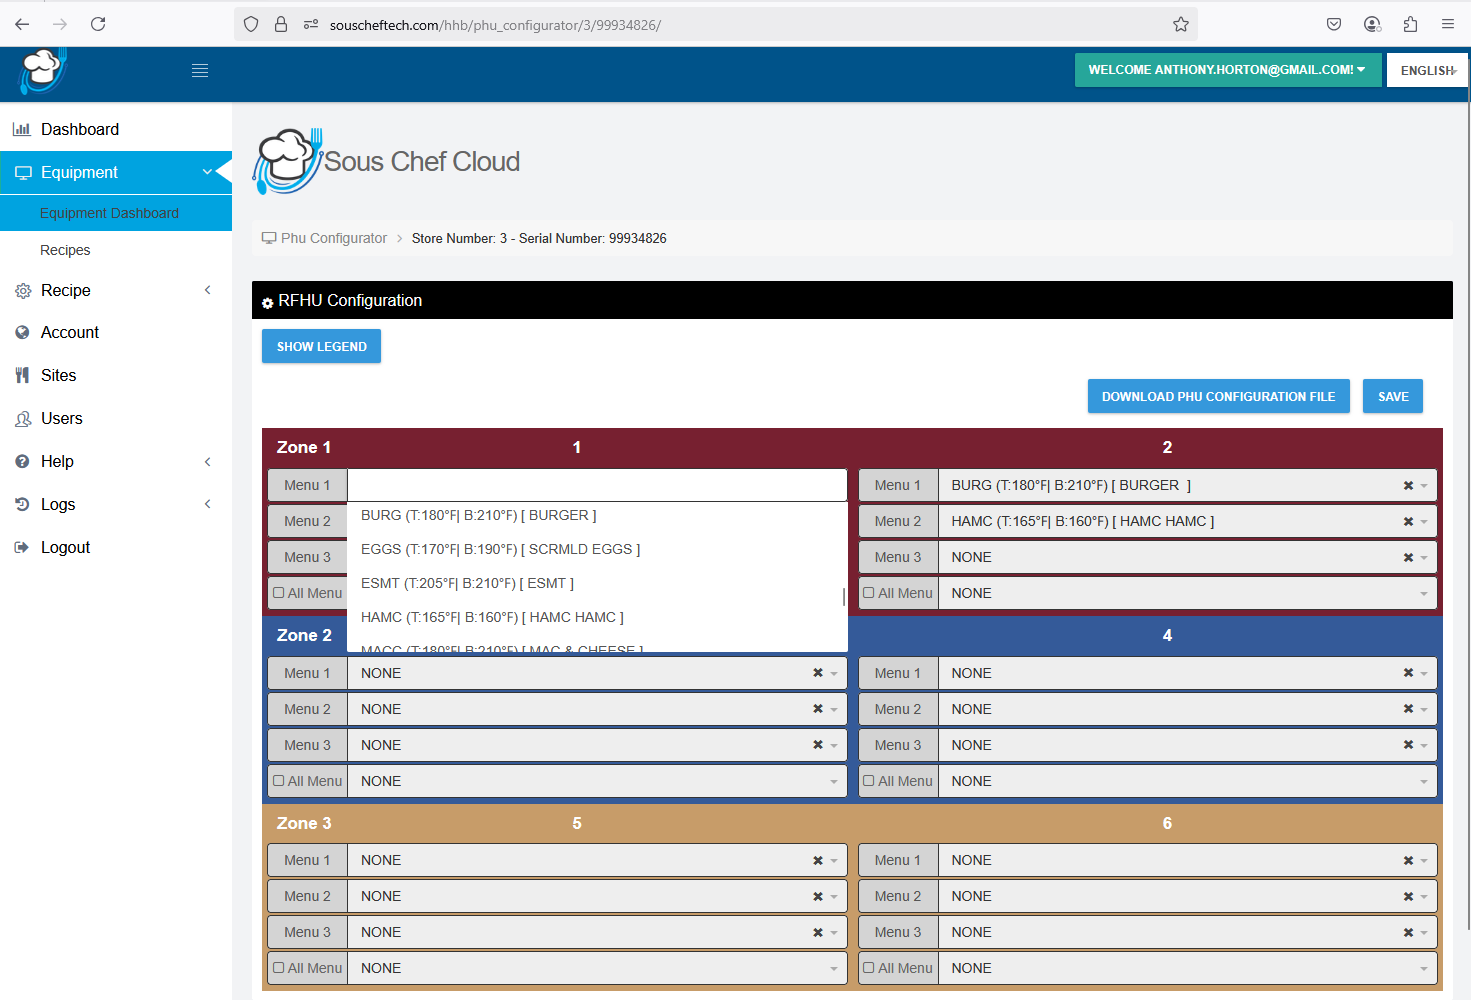
The “SHOW LEGEND” button can also be used to display the full recipe list for the full account.
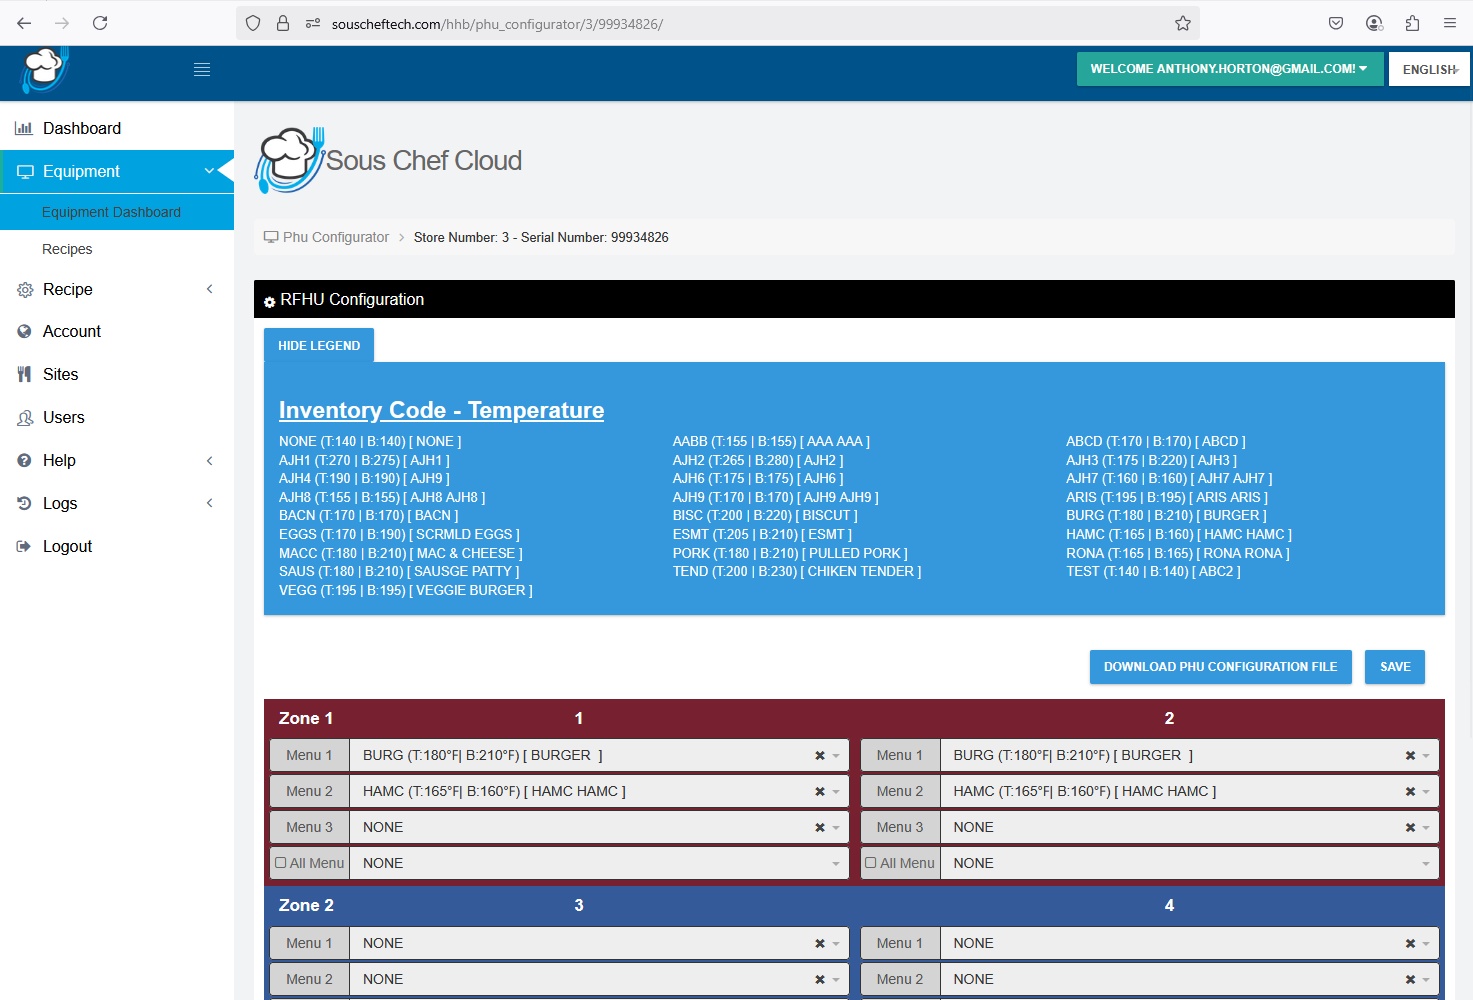
When grid programming has been completed a completely programmed RFHU looks like the below
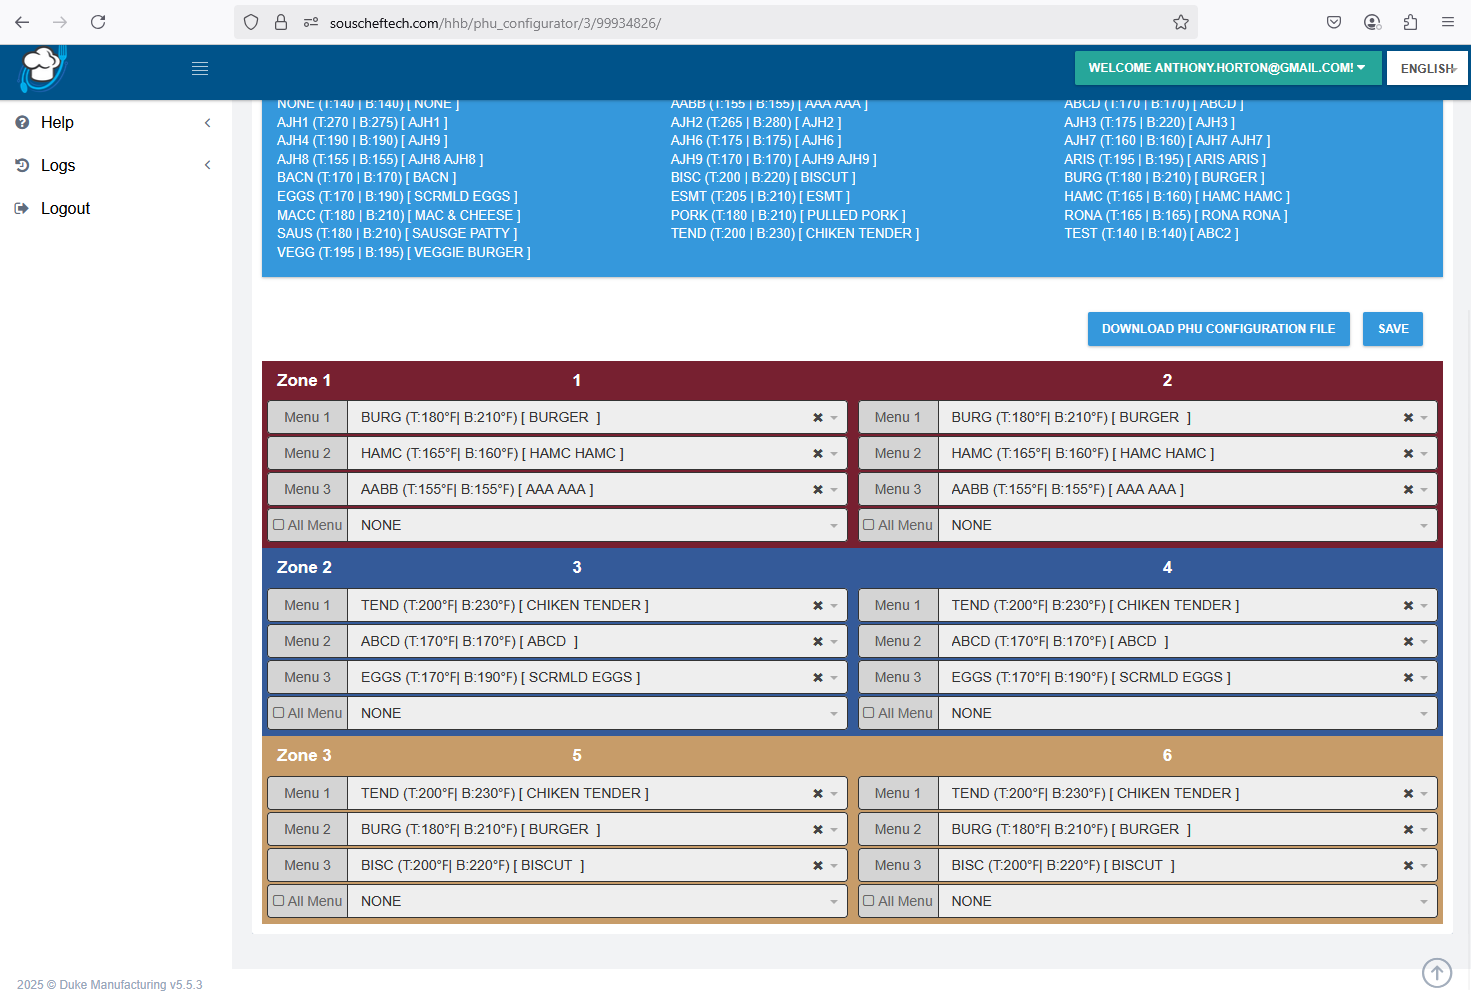
After programming the wells two options are available. “DOWNLOAD PHU CONFIGURATION FILE” will create a local RCP formatted file with the programming.
Alternatively, the “SAVE button” can selected. This will update the well programming on the unit instantly from the Sous Chef Cloud to the RFHU unit itself. This is a real-time recipe program update.
Another option available within the Sous Chef Cloud is to be able to view the online RFHU Recipe List. This is available by selecting “Recipes” under “Equipment Dashboard” on the Sous Chef Cloud side menu.
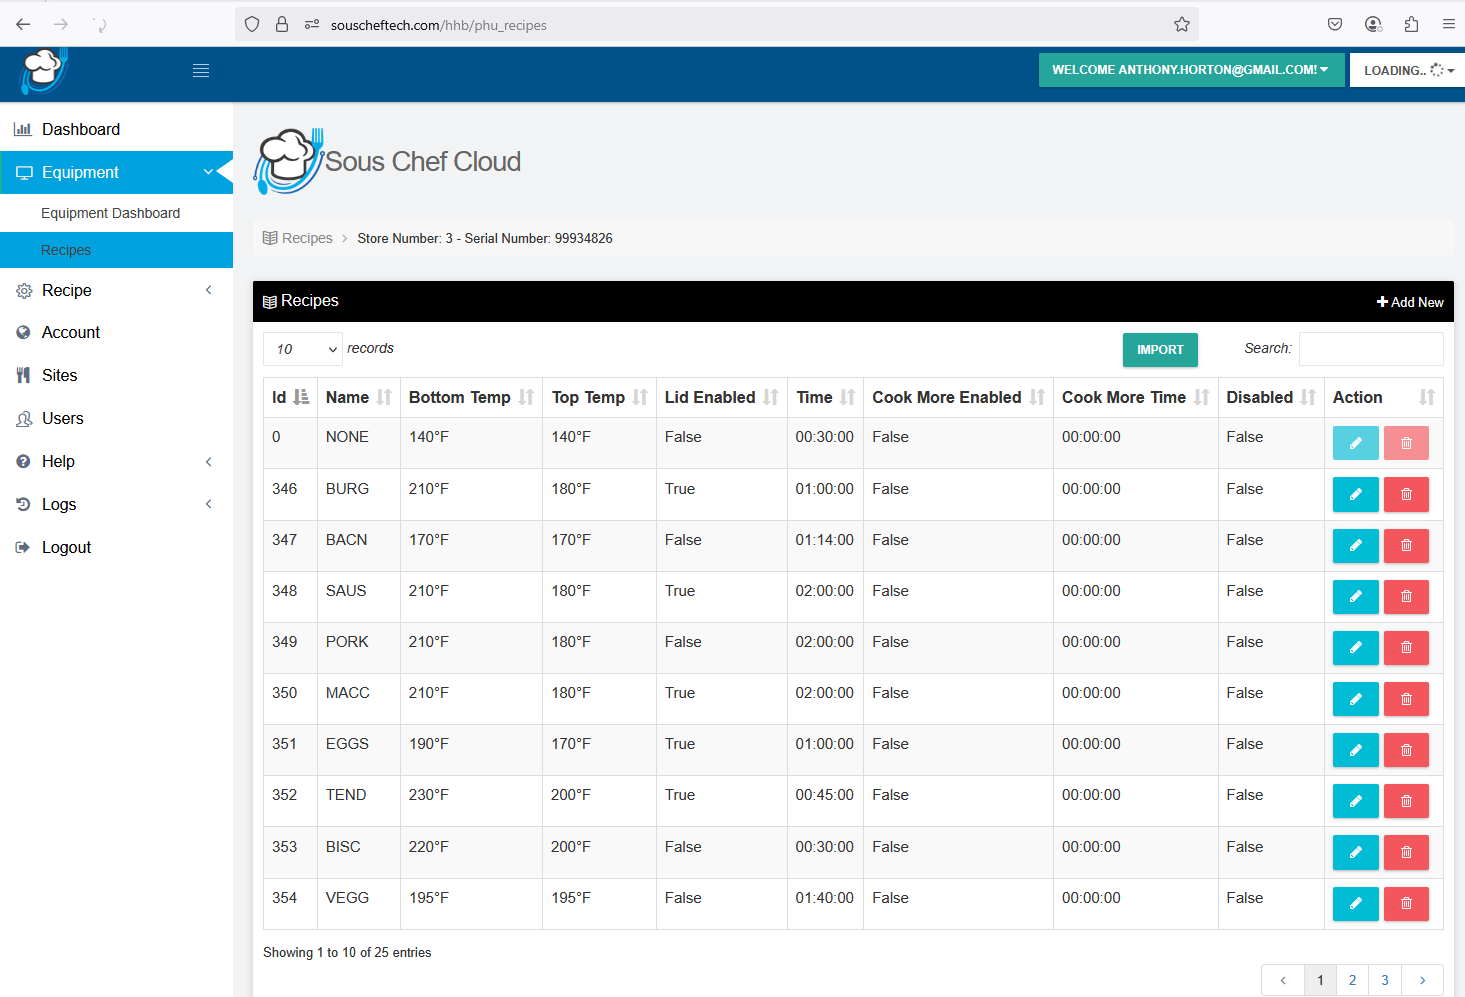
A list of local recipes found on the RFHU will appear here.
These can be edited, added, or deleted using the appropriate function which will update the connected RFHU local recipe set in real-time.
Selecting “Create Recipe” will load the following form where a new recipe can be added. Fields between “add” and “edit” are the same.
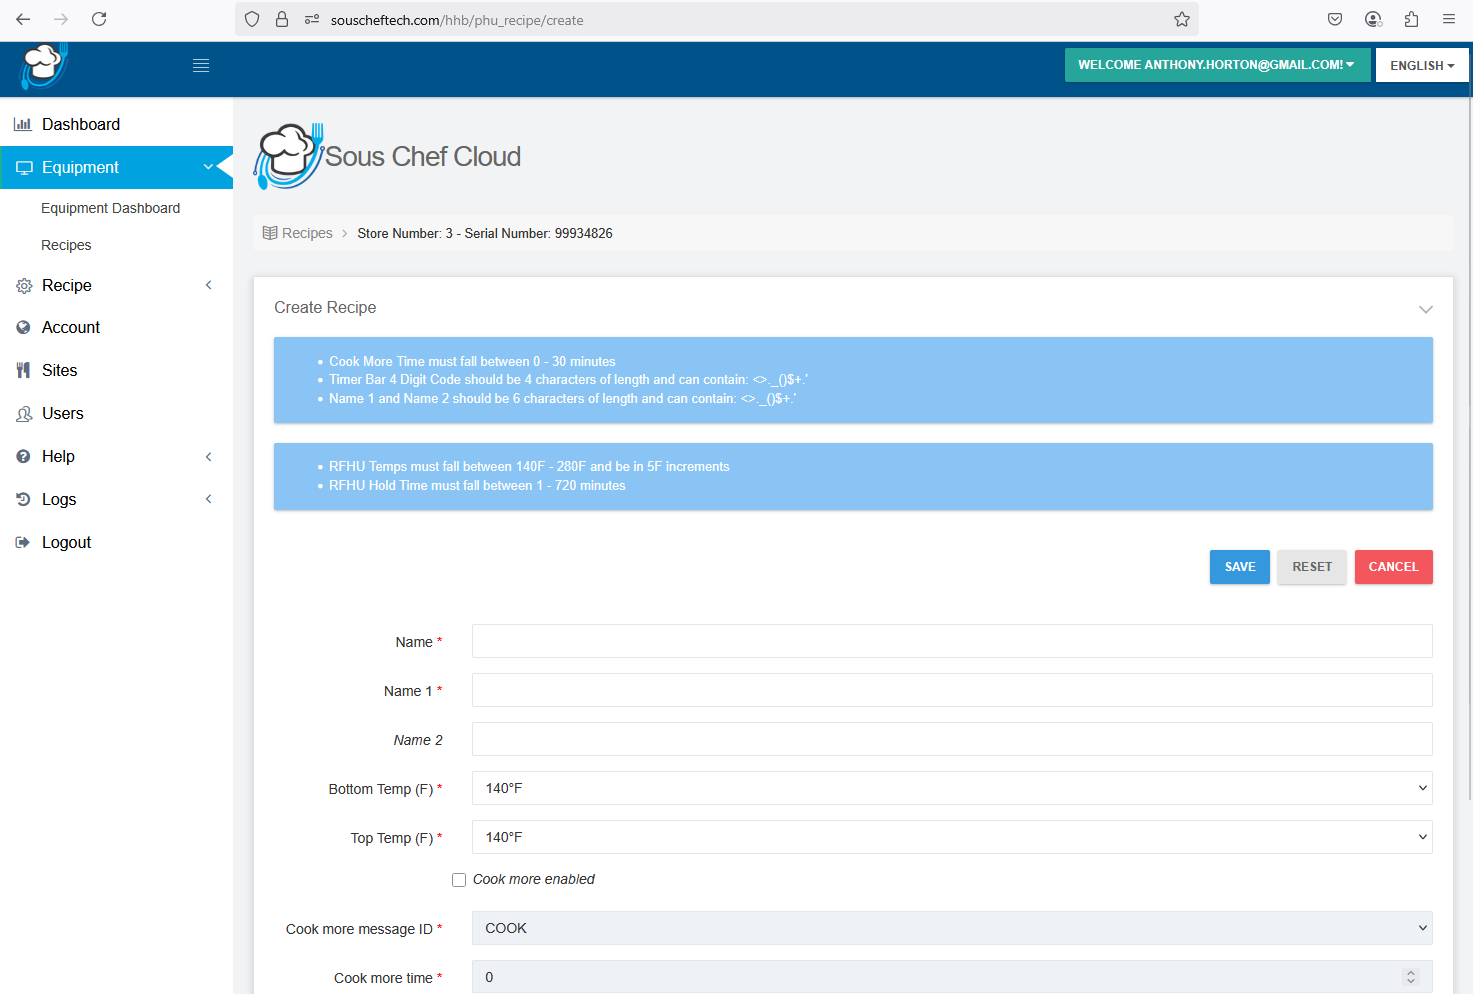
Fields consist of Recipe Name, Bottom Temp, Top Temp, Cook More enabled, Cook More Message ID, Cook more time, enabled/disabled and lid enabled/ disabled. When finished adding or editing select the “SAVE” button. The updated recipe list will be sent to the connected RFHU where it is updated in real time.
12 - ReadyFlex - Edit Inventory
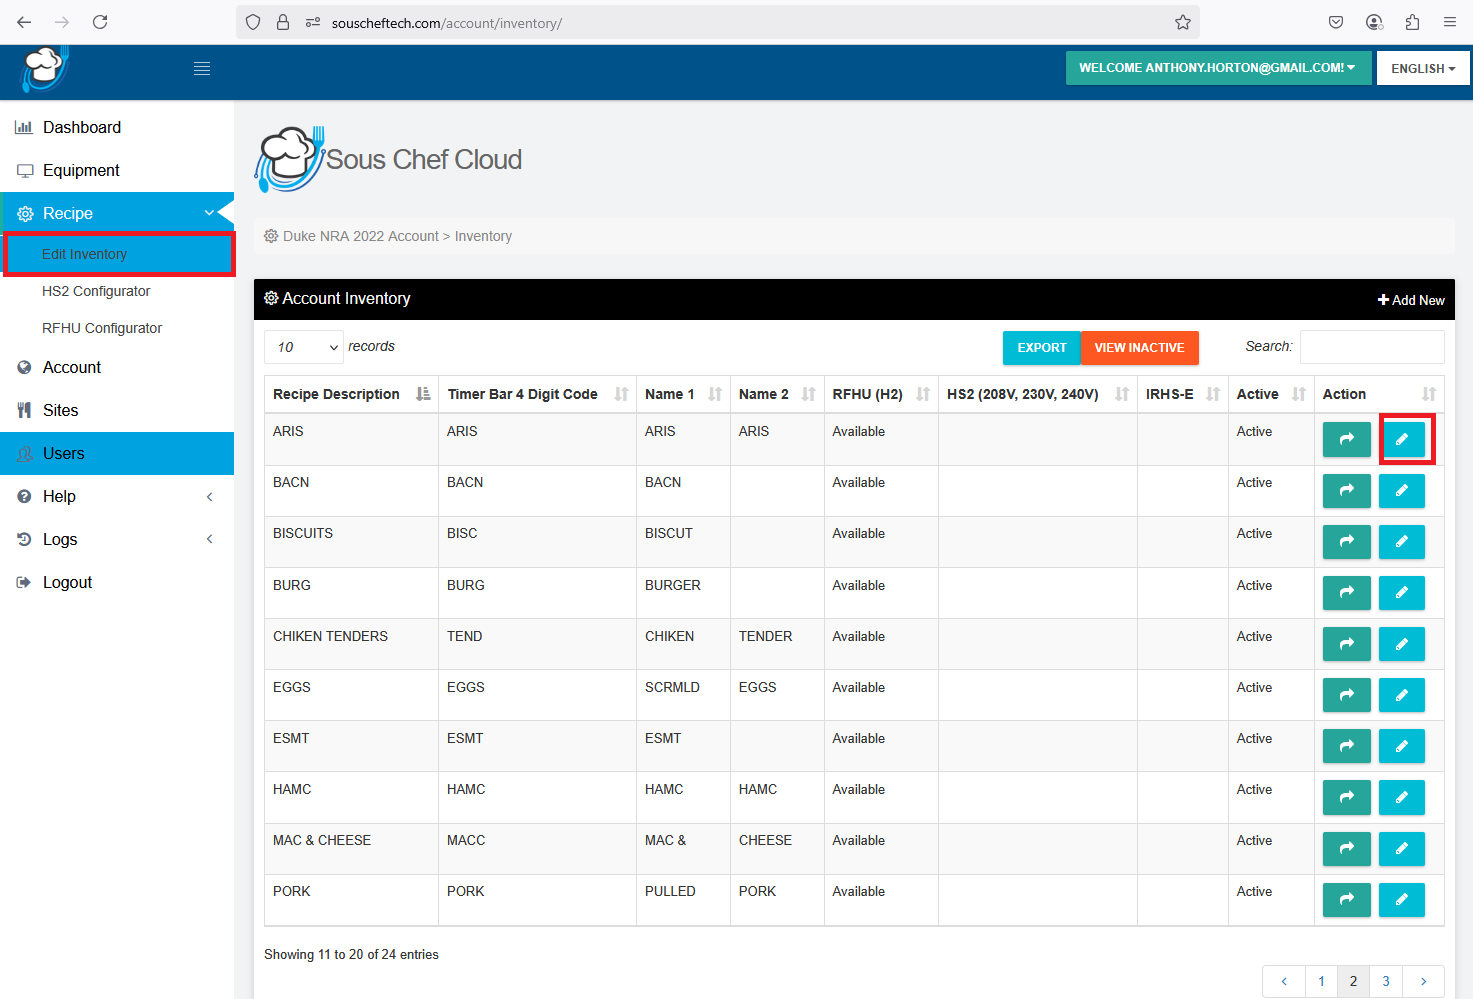
Go to the recipe settings then click edit Inventory. After clicking the edit inventory, a list of recipes will appear to choose the recipe you would like to change its setting.
For editing a recipe click the edit icon at the right corner.
Choose which part you would like to edit then click save.
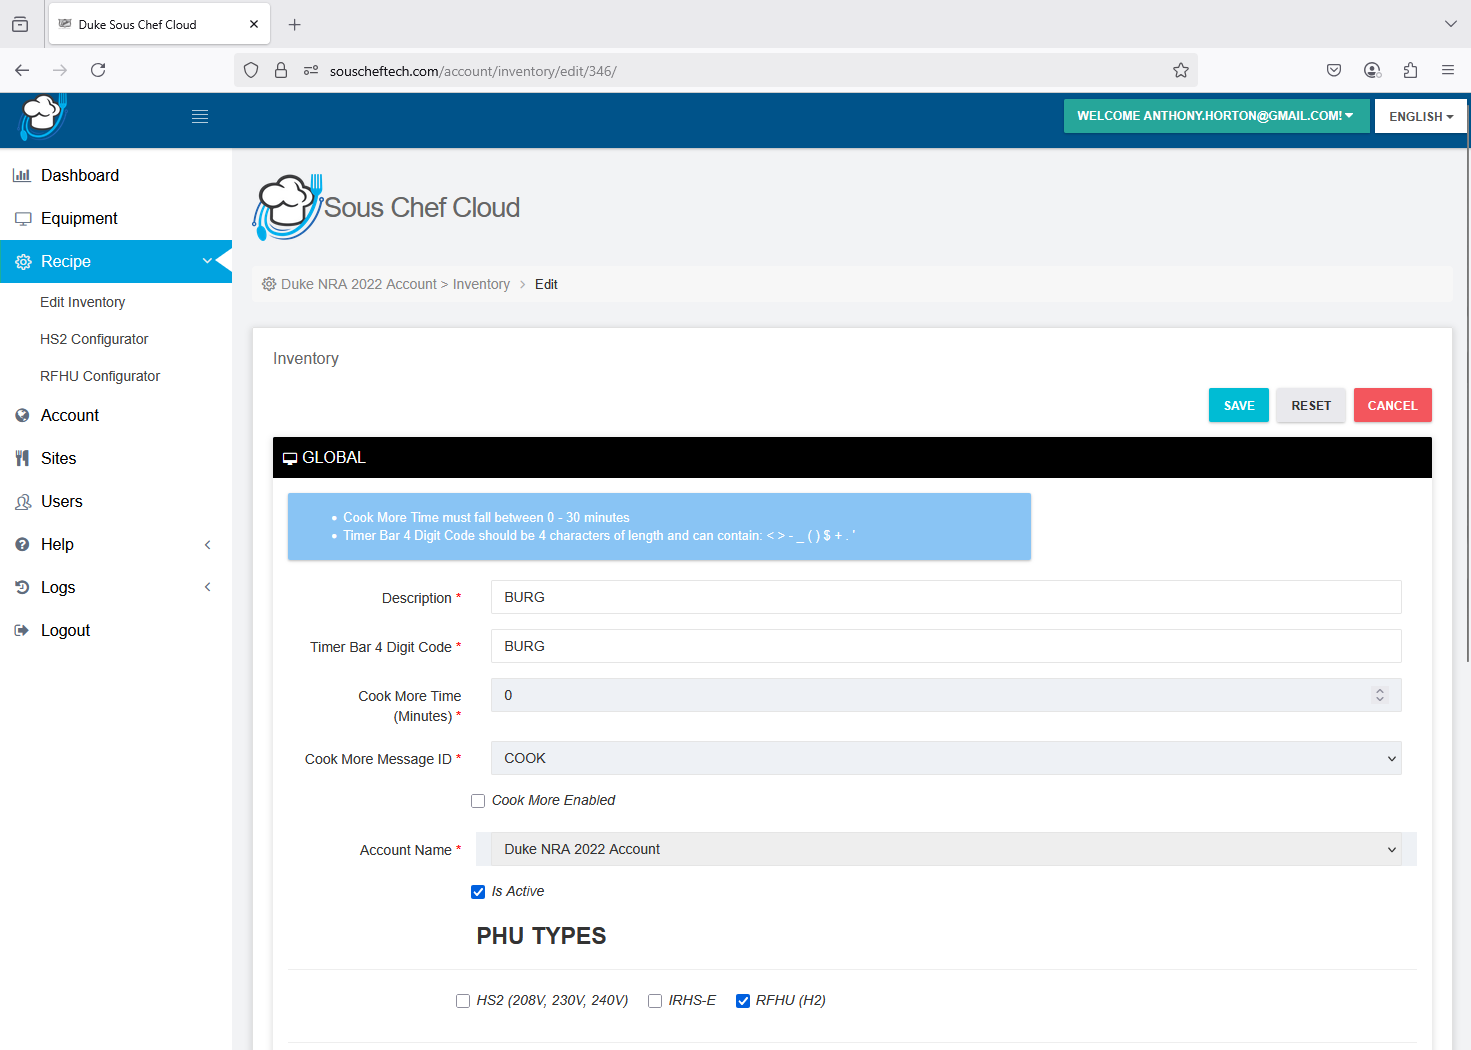
Note:
• Timer Bar 4 Digit Code should be 4 characters of length and can contain: < > - _ ( ) $ + . '
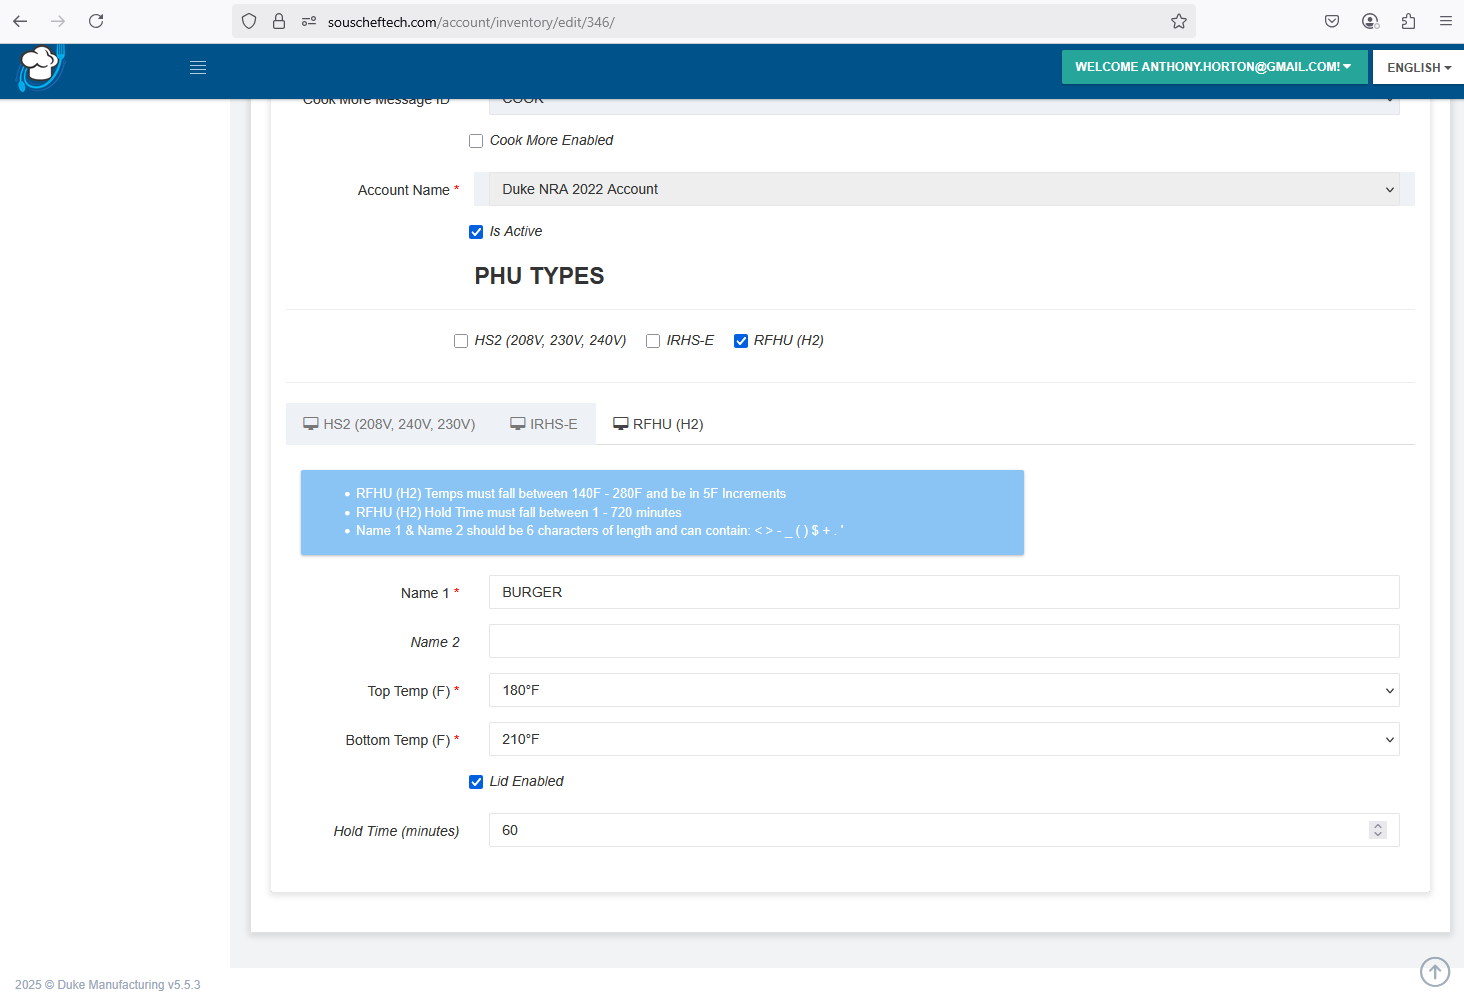
• RFHU (H2) Temps must fall between 140F - 280F and be in 5F Increments
• RFHU (H2) Hold Time must fall between 1 - 720 minutes
• Name 1 & Name 2 should be 6 characters of length and can contain: < > - _ ( ) $ + . '
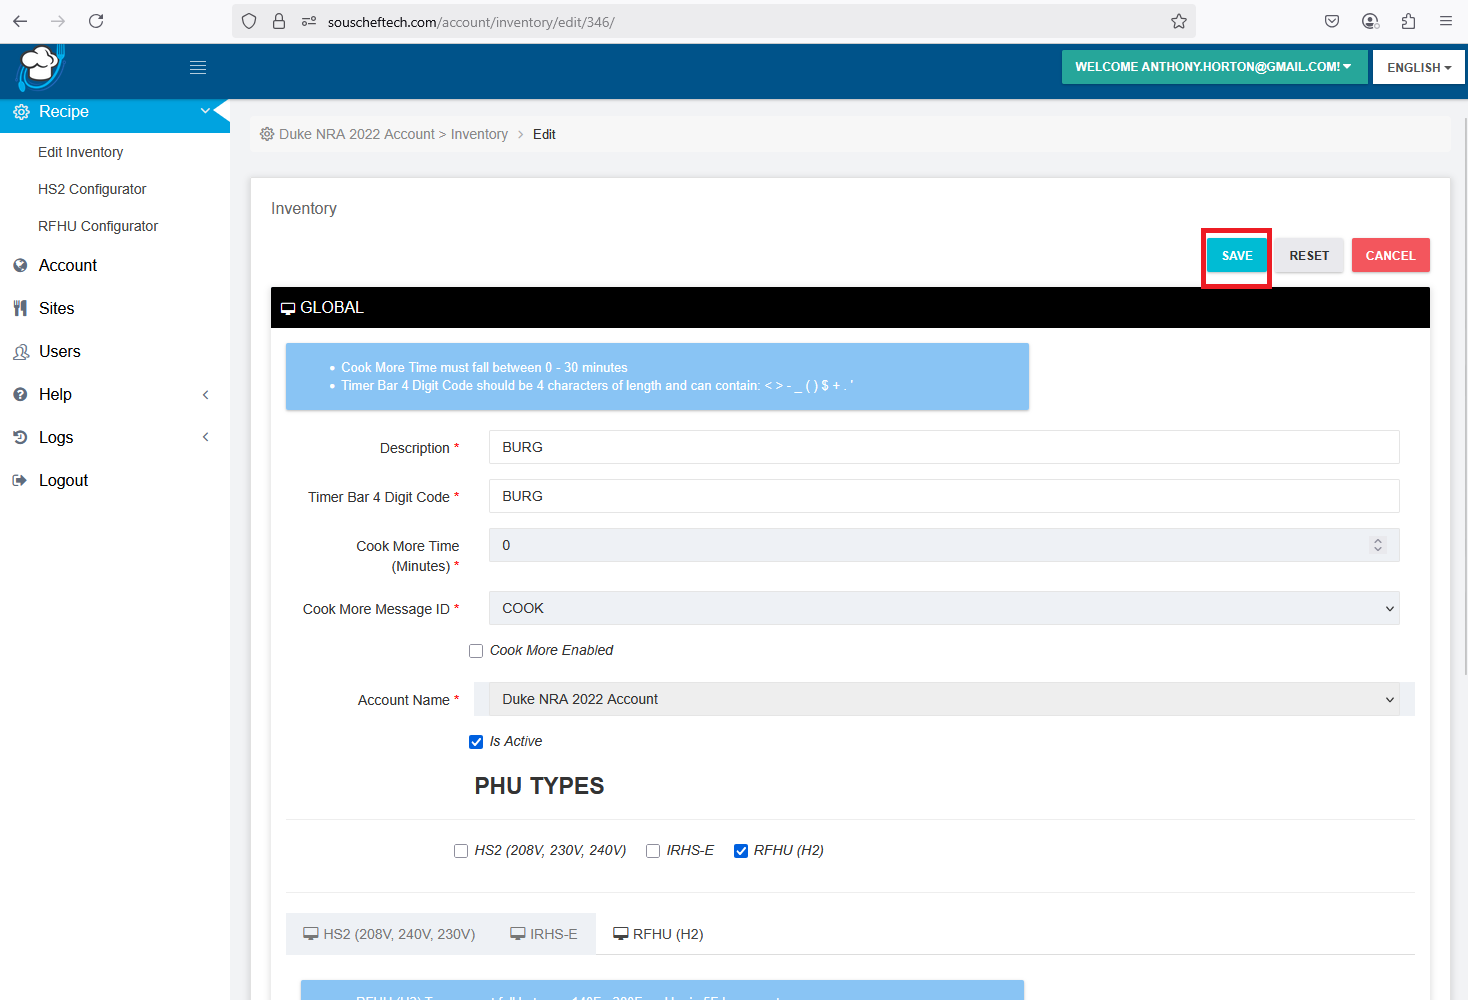
Do not forget to fill out all the required details then. Click save.
13 - ReadyFlex - Offline Programming
In some cases the connected RFHU unit may not be online and connected to the Sous Chef Cloud. If this is the case the RFHU recipe and programming settings can be modified on the actual unit UI or alternatively the RFHU Offline Configurator menu option can be used on the Sous Chef Cloud.
This can be found under “Recipe” menu on the side menu of the Sous Chef Cloud.
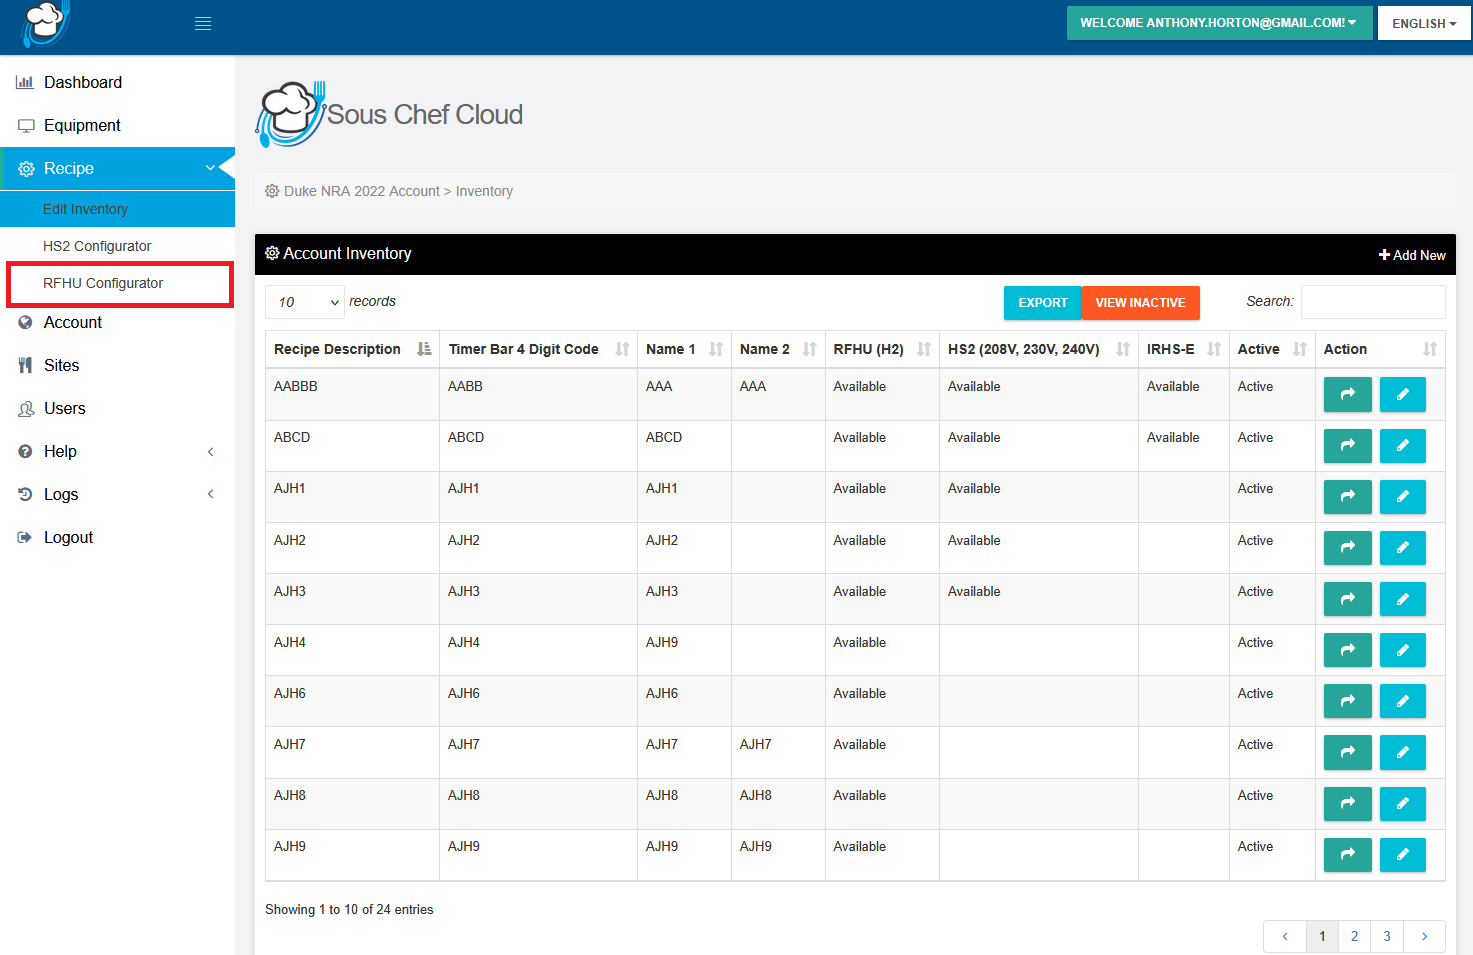
For the user’s Account an “offline recipe set” will always be available to the user. This information will be saved and be readily available if a USB file is required to be created.
The RFHU Configurator is available for well programming.
As the unit is not connected the RFHU configuration, for example 2x2, 2x4 will not be automatically detected
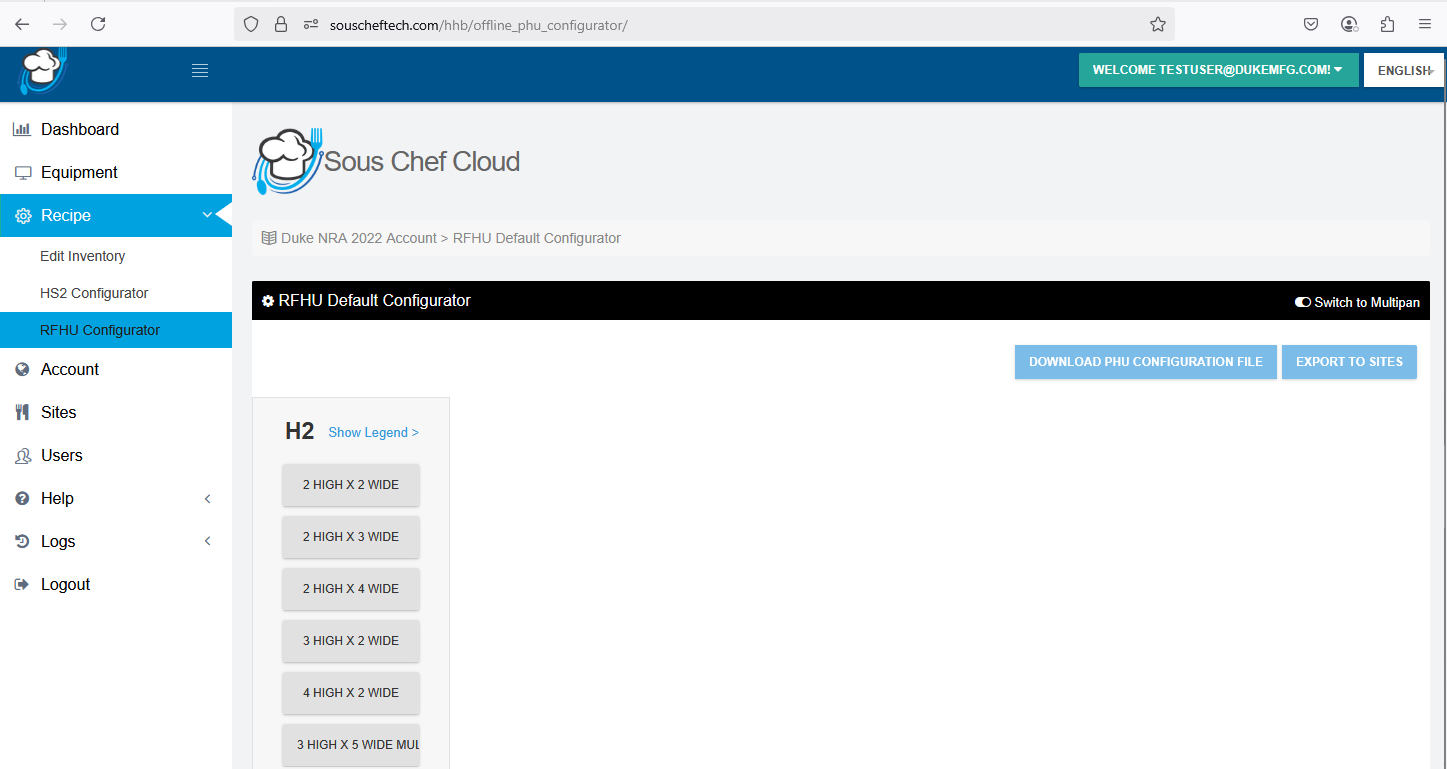
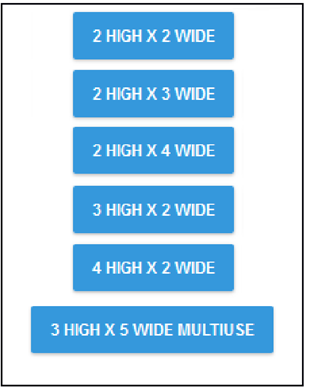
Instead a list of available configurations will be available for programming.
These include:
When a selected PHU configuration is selected the appropriate programming grid will appear. For example a 2x4 will appear as:
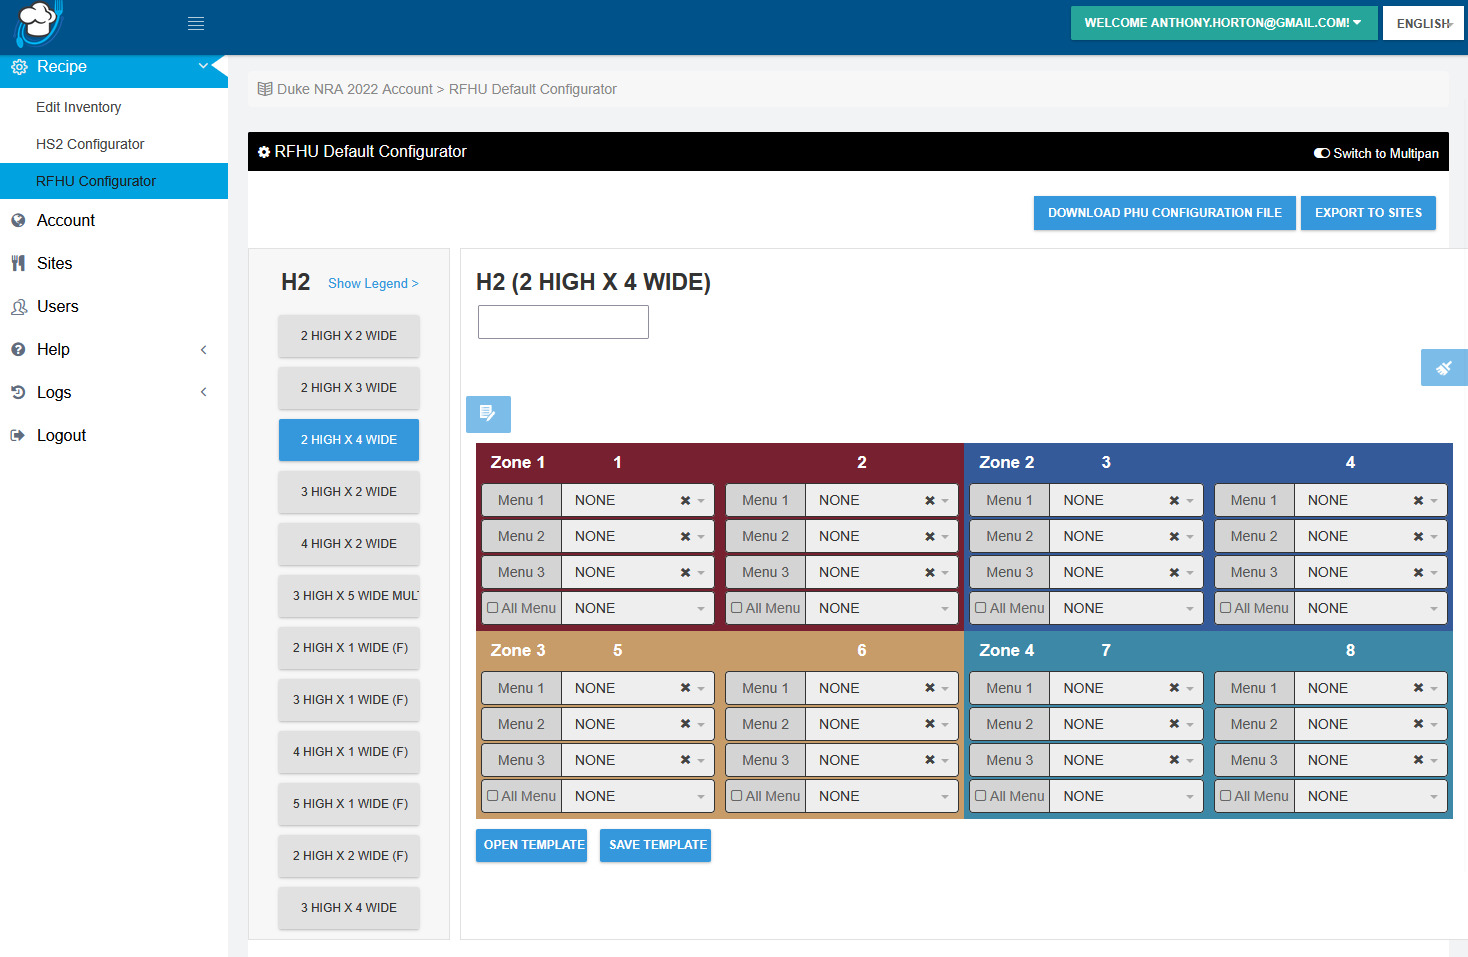
This can then be programmed in the same way as the online RFHU. For example:
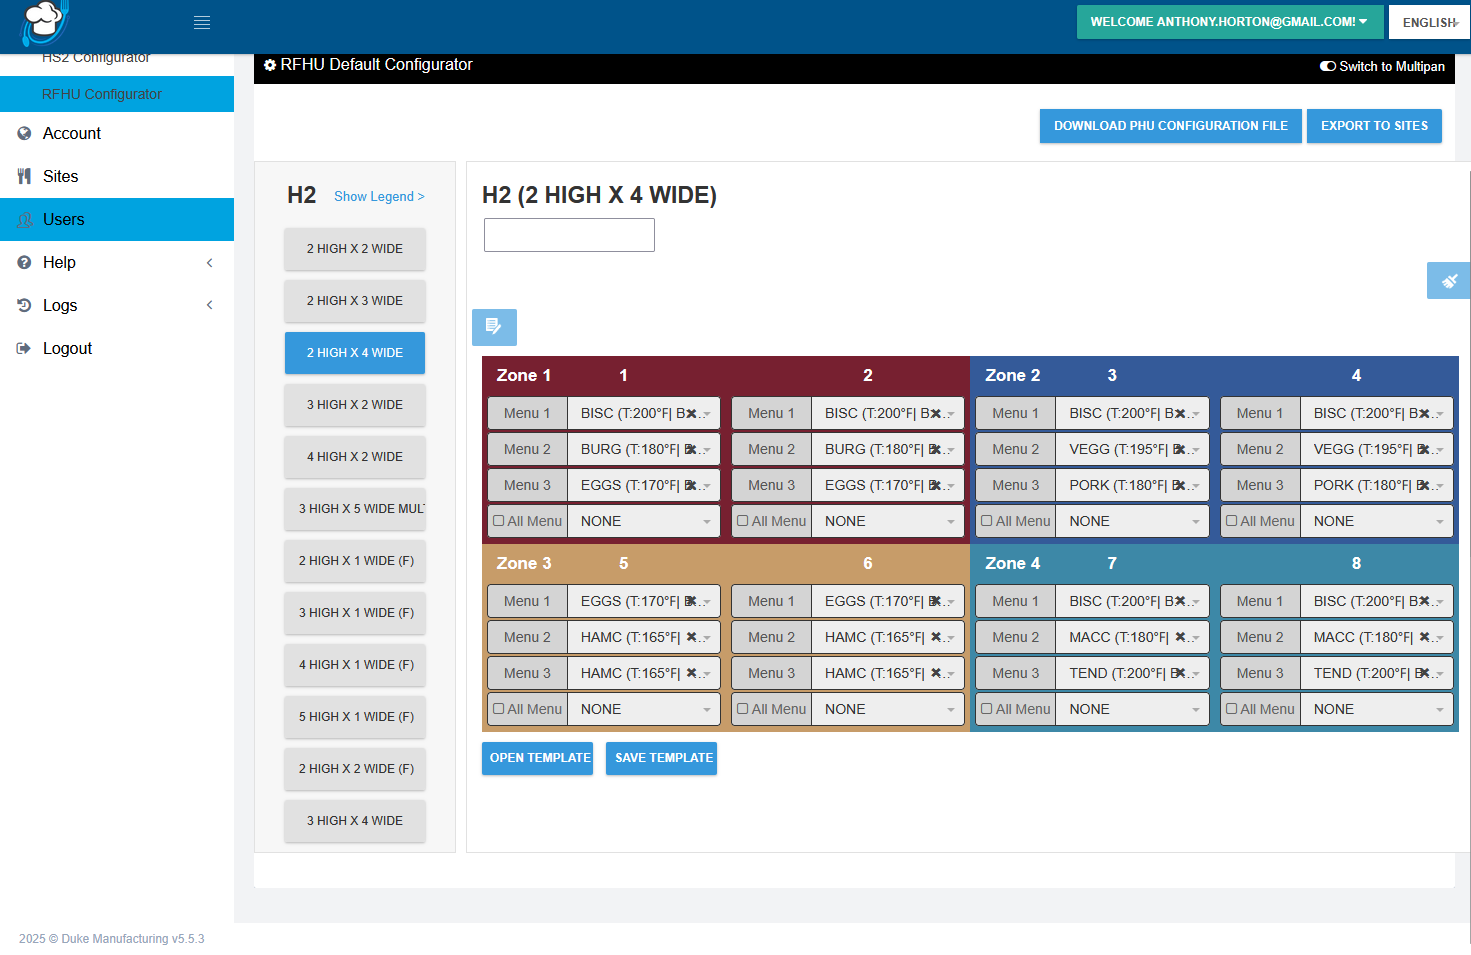
When finished select “DOWNLOAD PHU CONFIGURATION FILE” option. This will create a RFHU “RCP” file which contains both the recipe list and well mapping settings.
This file can then be copied to the “root” directory of a USB flash drive.
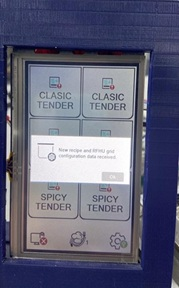
Plug this same USB drive into the USB port on an RFHU and if the configuration is correct both the recipe list and well programming will be uploaded on the unit itself. A confirmation message will appear on the RFHU display when a new recipe set has been successfully loaded.
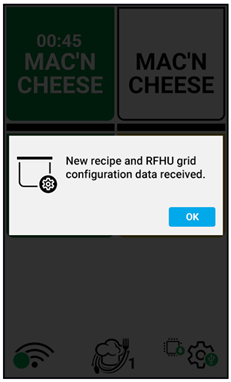
Press Ok, then wait for a few seconds to transfer the new recipe for the RFHU.
